Introduction
PowerLMS is a feature-rich online Ed-tech marketplace that makes it simple for you to manage your online education business. With the use of this script, teachers and students can communicate and exchange knowledge.
It is an all-in-one script for creating online courses, live webinars, sessions, live classes and enrolling students in them. The package contains a front-end website that is responsive and is controlled by an extensive dashboard for administrators, instructors, and students. Administrators have complete control over the system, whereas instructors can build numerous courses with Lessons and Tests. Users can look through this list, choose a course, pay for it if they want, and sign up to take it at any time and from any location.
Students will be able to use the educational content to raise their skill level, and instructors will be able to develop an endless number of video courses, bundle courses, live classrooms, live webinars, projects, quizzes, upload files, etc.
So why are you still waiting? Set up PowerLMS to start making money by teaching others.
Features
Smart script installation and update
Intuitive theme design with mobile responsive
Social and manual login/signup
Multiple Dynamic Frontend Layouts
Multi-Language support
Multiple content types (Video courses, Live Classes, Live Webinars)
Multiple Video Player Support (Youtube and Vimeo integrated)
Bundle courses
Course Subscription
Course Review System
Course completion certification
Option available for Free Course
Zoom integration for Live Sessions and Webinar
Webinars
Instructor dashboard
Admin dashboard
Role Management ( Manage admin roles)
Menu Manager
Course Manager
Course Statistics & Analytics
Payment Gateways Like Stripe, Razor Pay, PayPal, PayU, Offline
Invoice Print and Pdf support
Instructor Payout, Pay to Instructor
Instructor analytics and reports
Admin reports
Create and manage a Blog
Section On/Off for all homepage sections
Built-in accounting system
24/7 Professional Developer support
Installation
1. Local Computer
- Install
Xampp (Php v8.1)from here - Run the Xampp installer and open the Xampp control panel
- Make sure that you enable the Apache and MySQL services
- On mac you need to click "Start" on the Home tab, "Enable" on the Network tab and "Mount" on the Location Tab. Click "Explore" on the location tab to open your Xampp/Lampp folder
- Install
Composerfrom here - On Windows, download and run the installer
- On Mac, copy the php commands and run in the terminal. Then copy the mv command and run in terminal. You can also install composer with Homebrew
- Unzip
PowerLMS.zip. - Extract
power-lms-script.zipto below htdocs folder location. - Windows - C:\Xampp\htdocs
- Mac - /opt/lampp/htdocs
- Create a database using one of the sql files
- Once Apache and MySql as started successfully open a browser such as chrome, copy and paste the url "http://localhost/dashboard/" then click on the phpMyAdmin tab. You should see the phpMyAdmin panel, click on the database tab in order to create a new database.
- Go to location, edit .env to update database and other configurations.
- Open your command prompt terminal and cd to the "/htdocs/power-lms-script" folder
- Run
php artisan storage:link - Run
php artisan serve - And you are ready to go!
- Go to localhost:8000 to visit your LMS
2. VPS and Virtual Machine
- Install Nginx, MySql 8.0 and Php v8.1
- Unzip
PowerLMS.zip. - Create a database using one of the sql files and extract
power-lms-script.zipto a desired location - Configure Nginx to point your domain to
location/publicdirectory, Read More. - Go to location, edit .env to update database and other configurations.
- And you are ready to go!
3. Shared Hosting
- MySql 8.0 and Php v8.1
- Unzip
PowerLMS.zip. - Create a database using one of the sql files and extract
power-lms-script.zipto a desired location - Go to location, edit .env to update database and other configurations.
- In cPanel -> Domains change the root directory of your domain to
location/publicdirectory. - Go to location, edit .env to update database and other configurations.
- And you are ready to go!
Note :
- Default credentials for Login:
For Admin => Email :admin@lms.comPassword:123456
For Instructor => Email :instructor@lms.com.Password:123456
For Student => Email :student@lms.comPassword:123456 - There are various scheduled commands in this script. You have to add
following
job in your CRON:
* * * * * cd /path-to-your-project && php artisan schedule:run >> /dev/null 2>&1 -
If you see images not showing, login as admin and click troubleshoot in
Configurationsmodule. - In some shared hosting: symlinks, exec etc might be disabled, enable APP_DEBUG in .env and check for appropriate error.
Mail Setup
This is compulsory to setup for email communication. Otherwise it will create
errors.
To set this up go to
Dashboard click on System and select
Configurations.
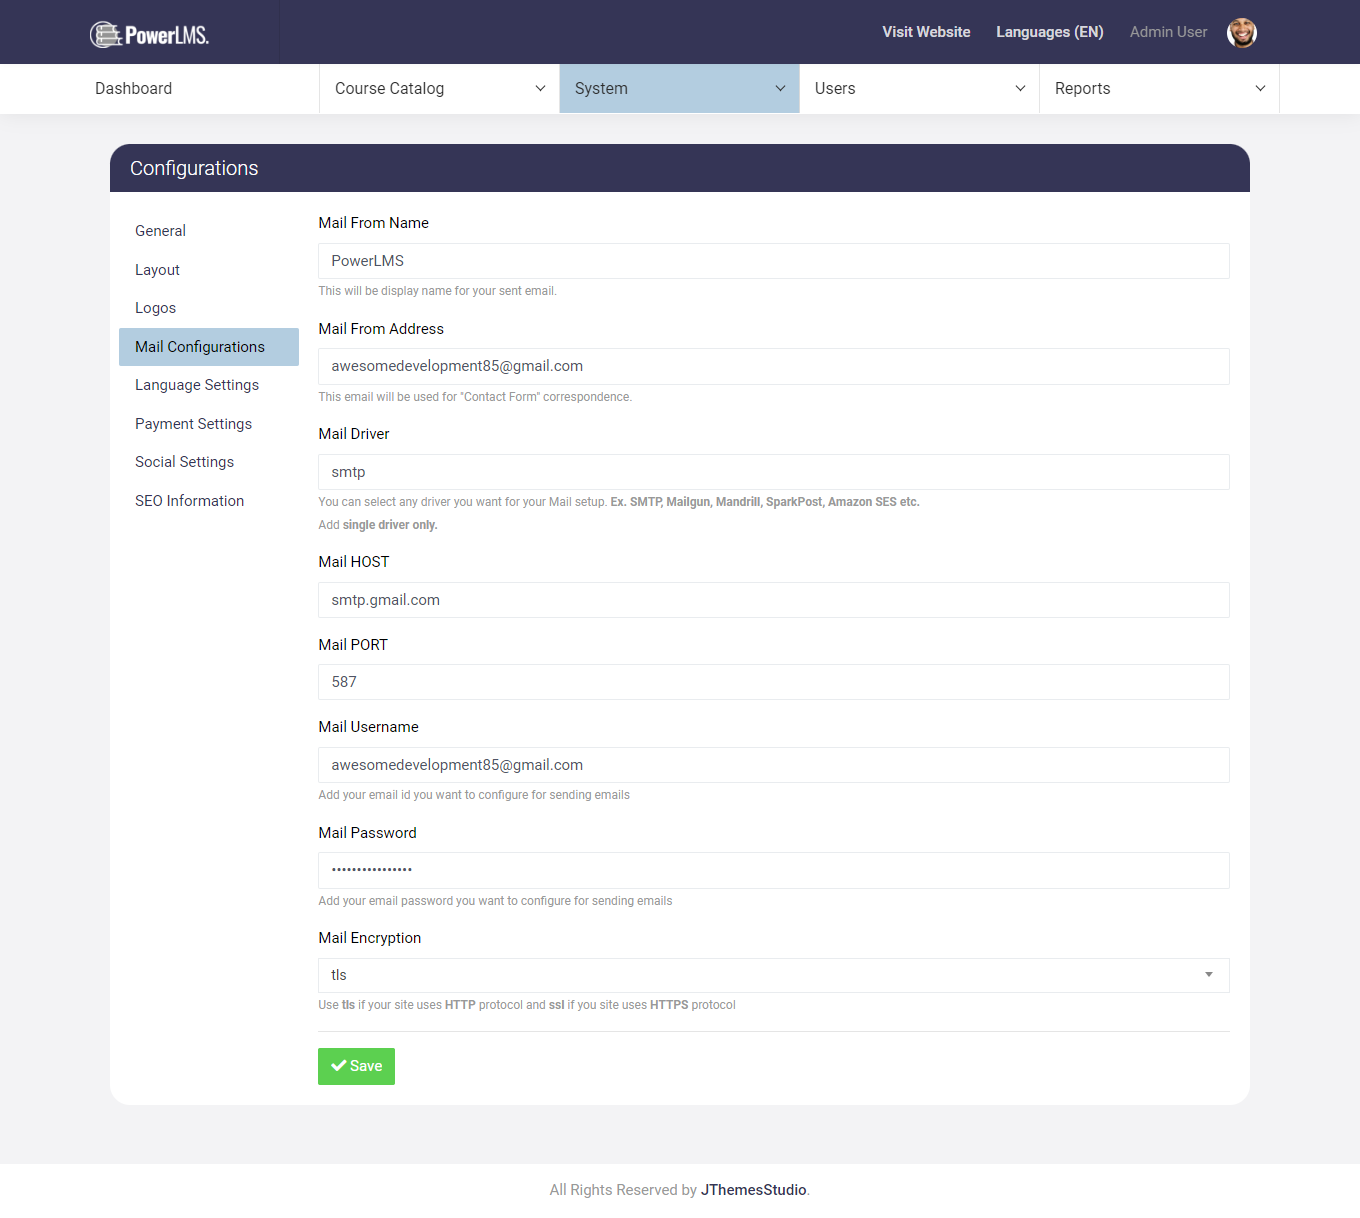
Now click on Mail Configuration
tab.
It will
look like this:
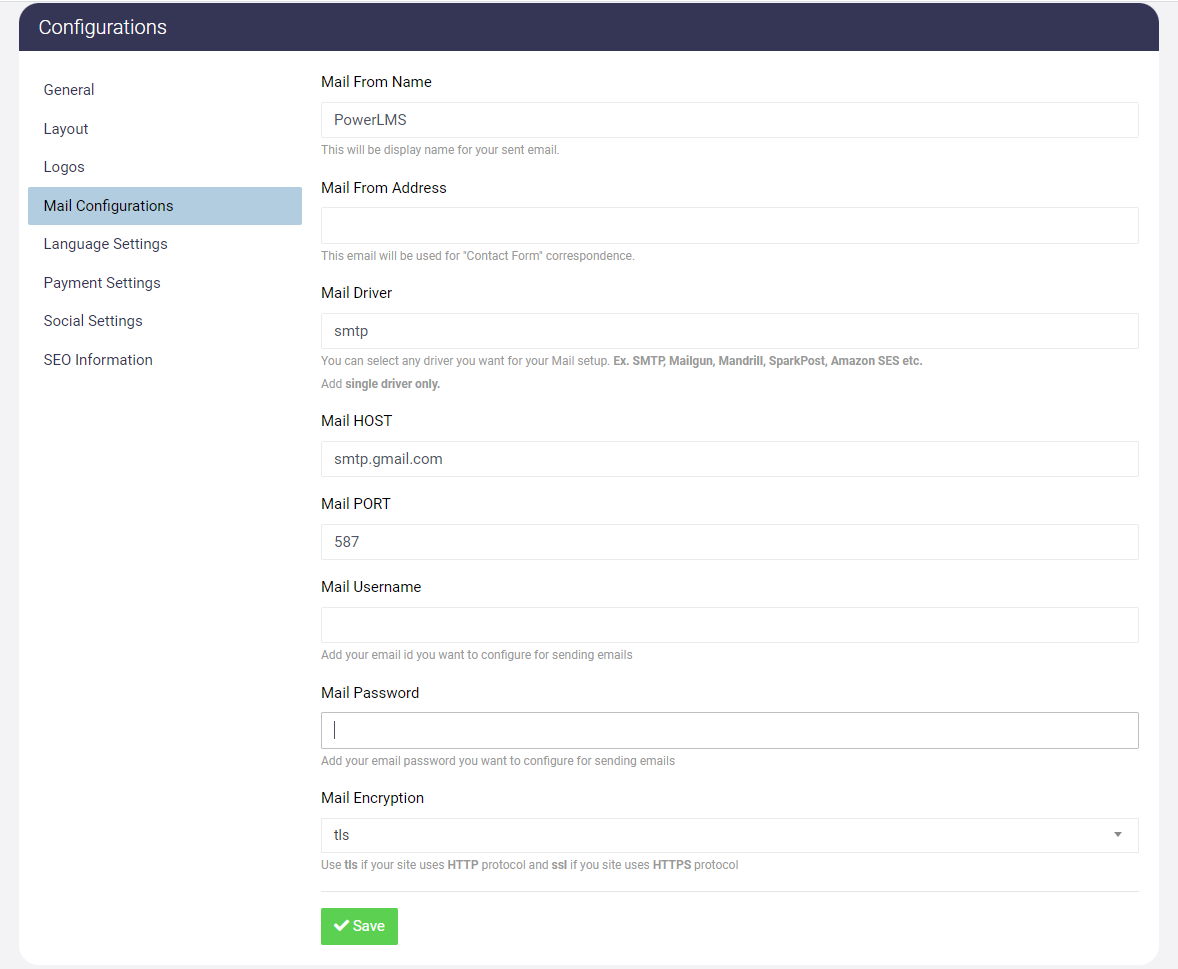
Set up Mail configuration according to your email host
and
read all the instructions written below input boxes
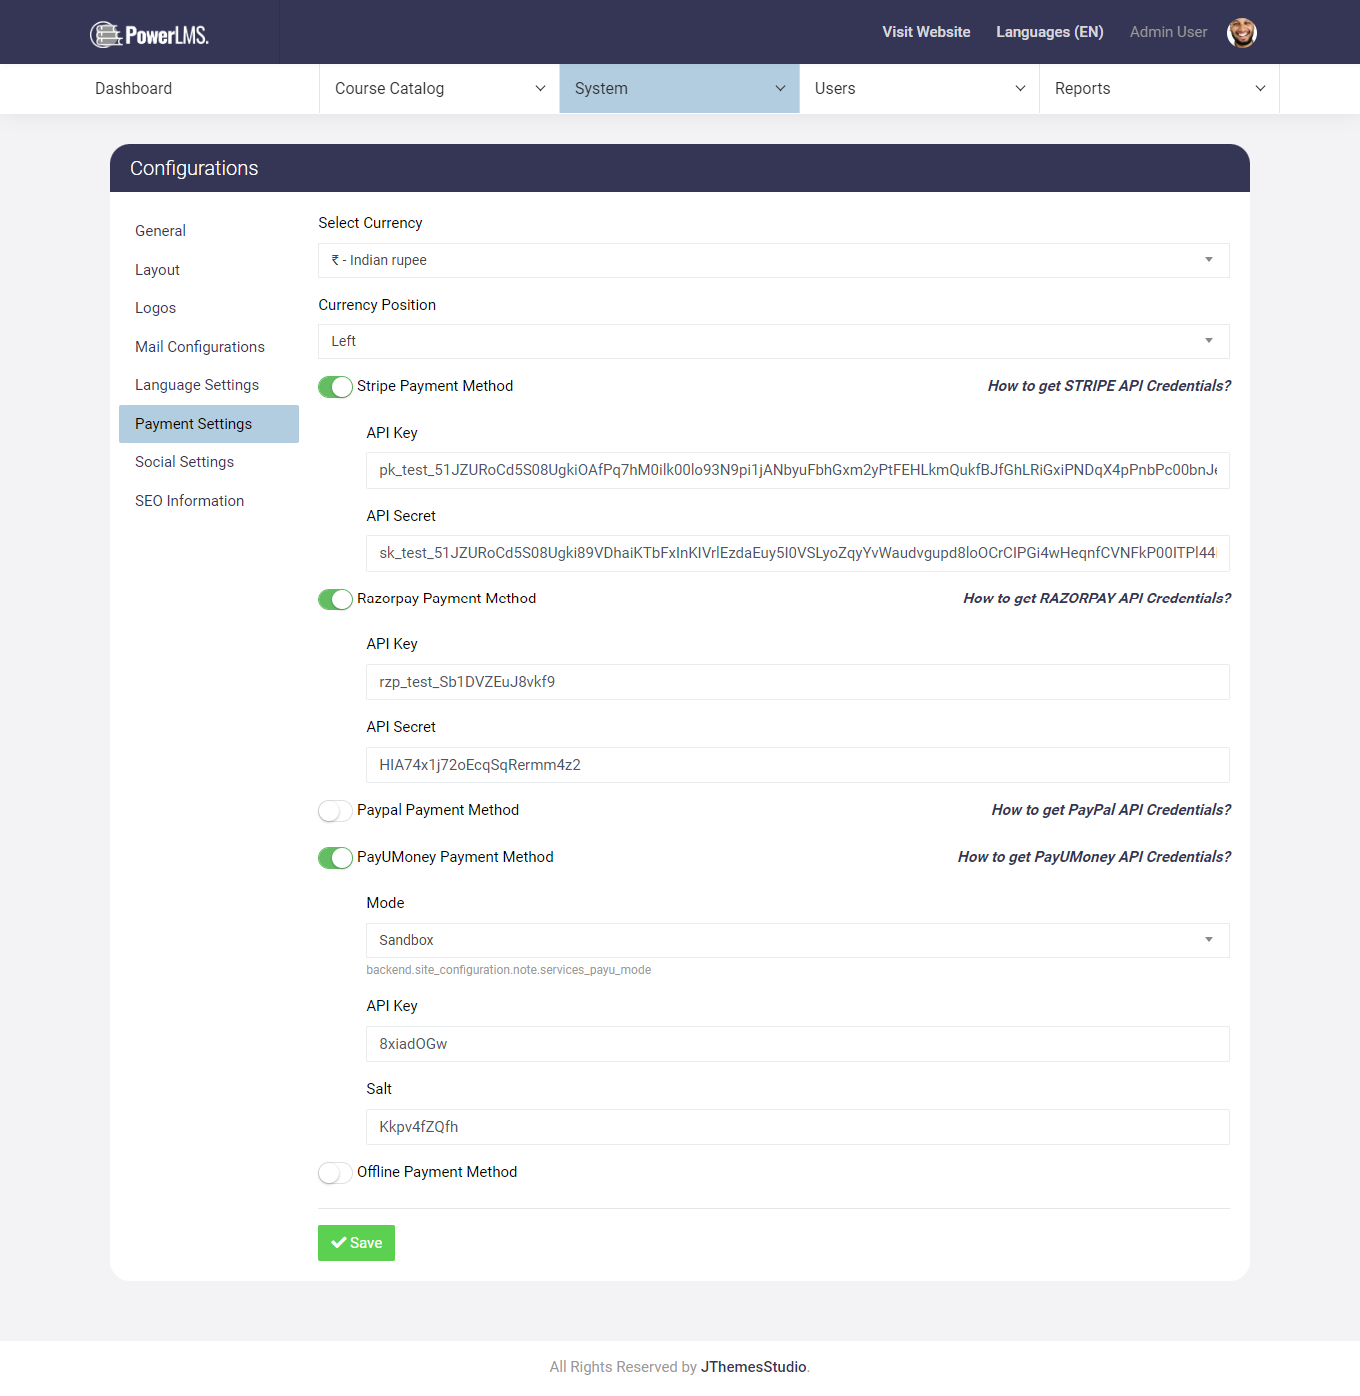
Payment Setup
This is compulsory to setup for payments functionality. Otherwise user will not
be
able to make payments to your products
Dashboard click on System and select
Configurations.
Now click on Payment Configuration
tab. It
will look like this:
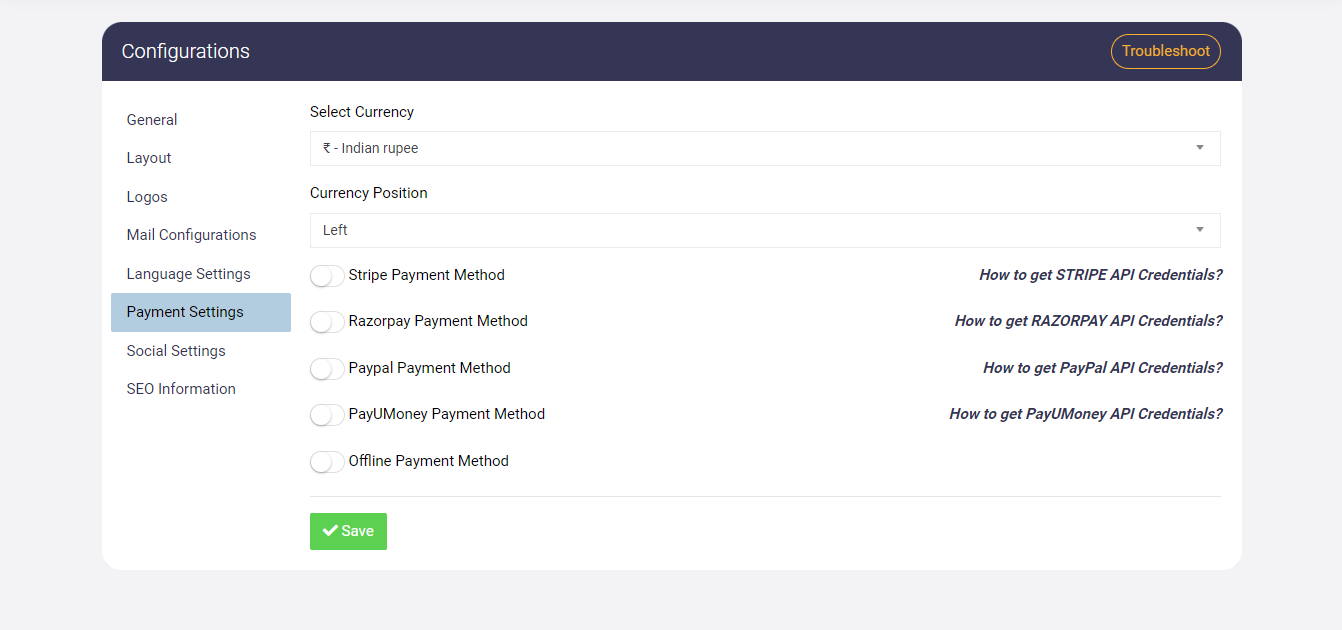
Set up Payment configuration according to your required
payment methods and select currency you want to deal with in purchases. Only
checked
payments methods will be shown on Checkout page. It
means you can turn on/off all these payment methods.
Dashboard
Preview your sales and platform earnings, payments and payouts, course status, and so on within a glance. Also, search the desired course with an optimized filtering option.
Course Catalog
It consists of three submenus.
- Categories
- Courses
- Badges
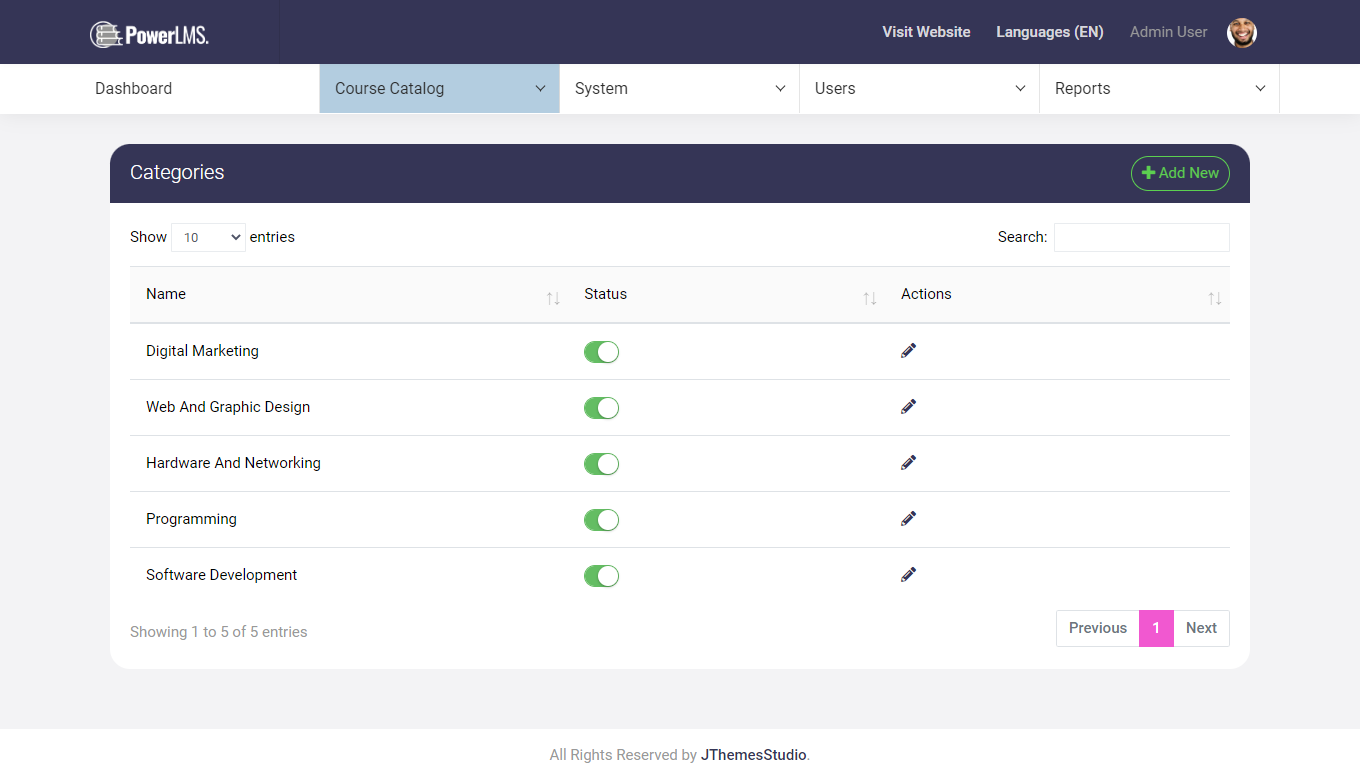
1. Categories
This is an independent CRUD. Categories will be used to add to the Course. The basic requirements to add a Category will be the name and the admin can select the icon for the category as it will be displayed in various places of the theme with the icon.
2. Course
Admin will have access to view the course only. From the courses page, the admin will get to know the names of the courses, instructors for each course, categories the courses are associated with, total Lessons and chapters for the course, price, and status of the course (if it's active or submitted for review, pending).
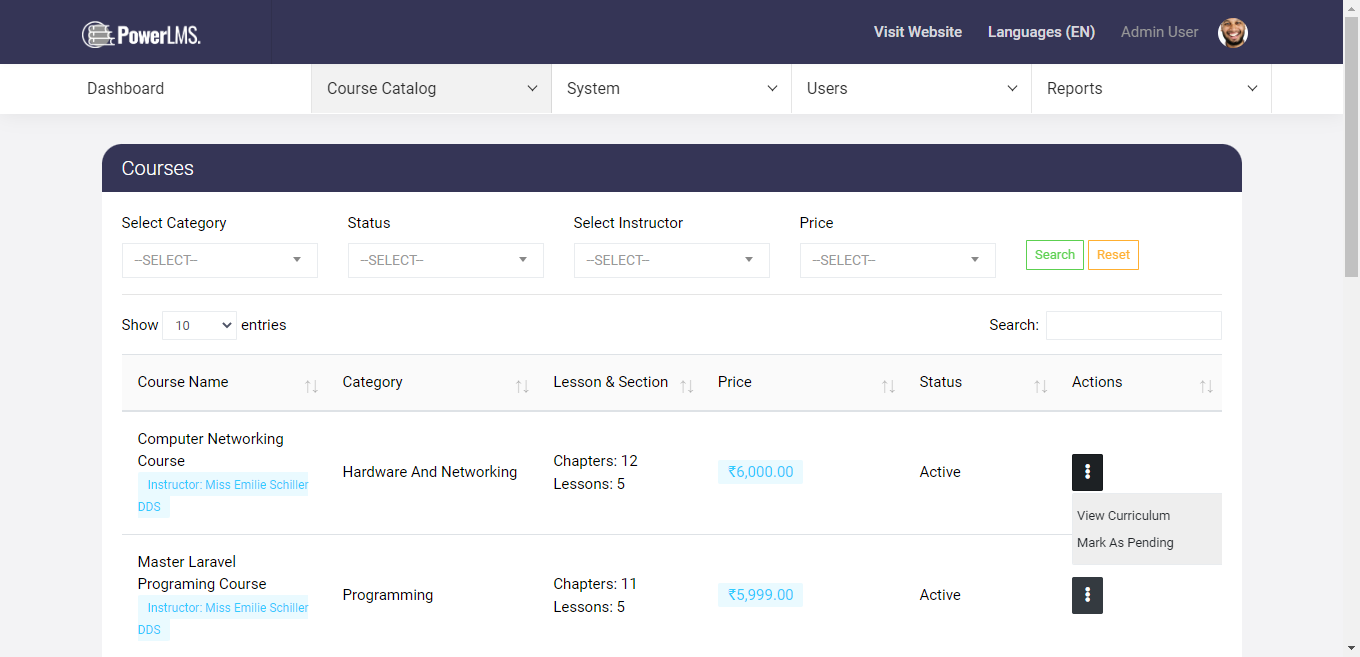
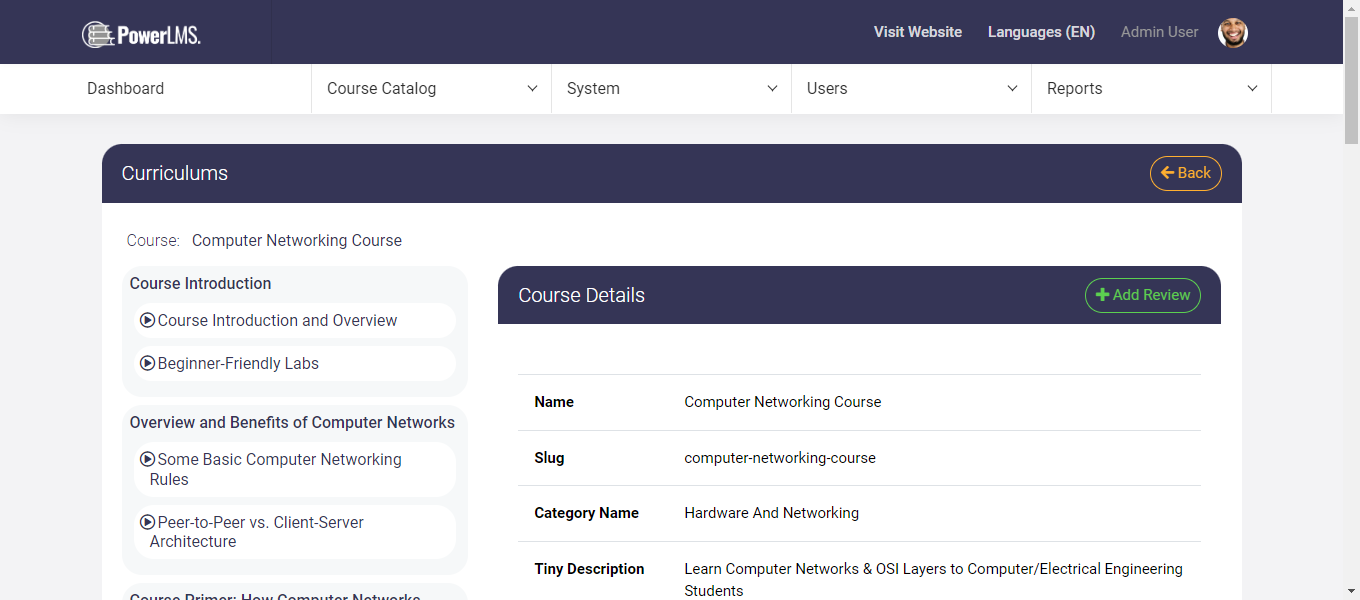
By clicking on , the admin can view the curriculum of the course or mark it as active to publish the course. Admin can review the course and, if anything needs to be changed, admin can leave a comment on a specific lesson, which will be visible to the Instructor.
3. Badges
It will show as a badge on the front-end course cards like Free, Tending, etc as the badge name set by the admin.
System
This is one of the most important menus which is accessible to the Admin only. The entire LMS can be customized from here. It has the following submenus.
- Blog Categories
- Blogs
- Pages
- Configurations
- Translation Manager
- Widget
- Menu Manager
- Email Templates
- Languages
- Banners
- Sponsors
- Update
- Backup
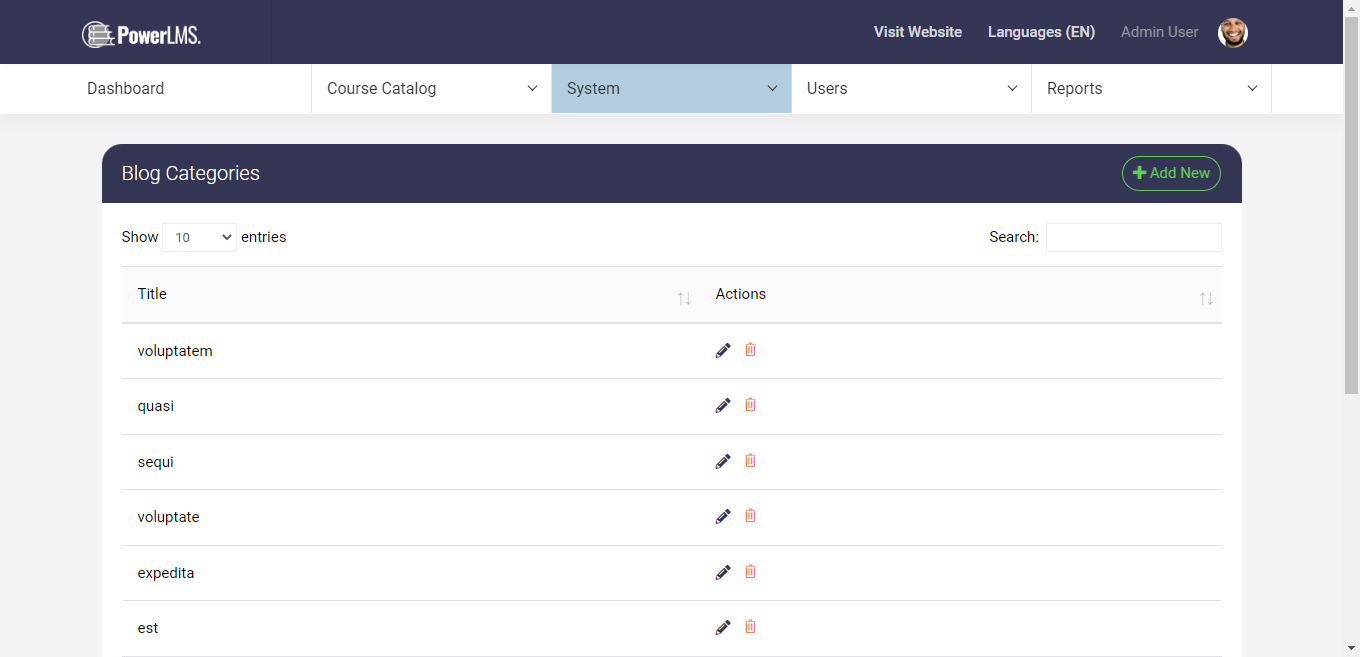
1. Blog Categories
Admin can create categories to utilize them to categorize the blogs according to the blog niche.
2. Blogs
This is an additional feature Admin can use for blogging as well. Create, edit, update, and delete blogs with this Blog Manager. Including rich text editor, Featured Image as well as custom Meta Tags inputs for SEO-friendly blogging. Admin can utilize categories to categorize the blogs according to the blog niche.

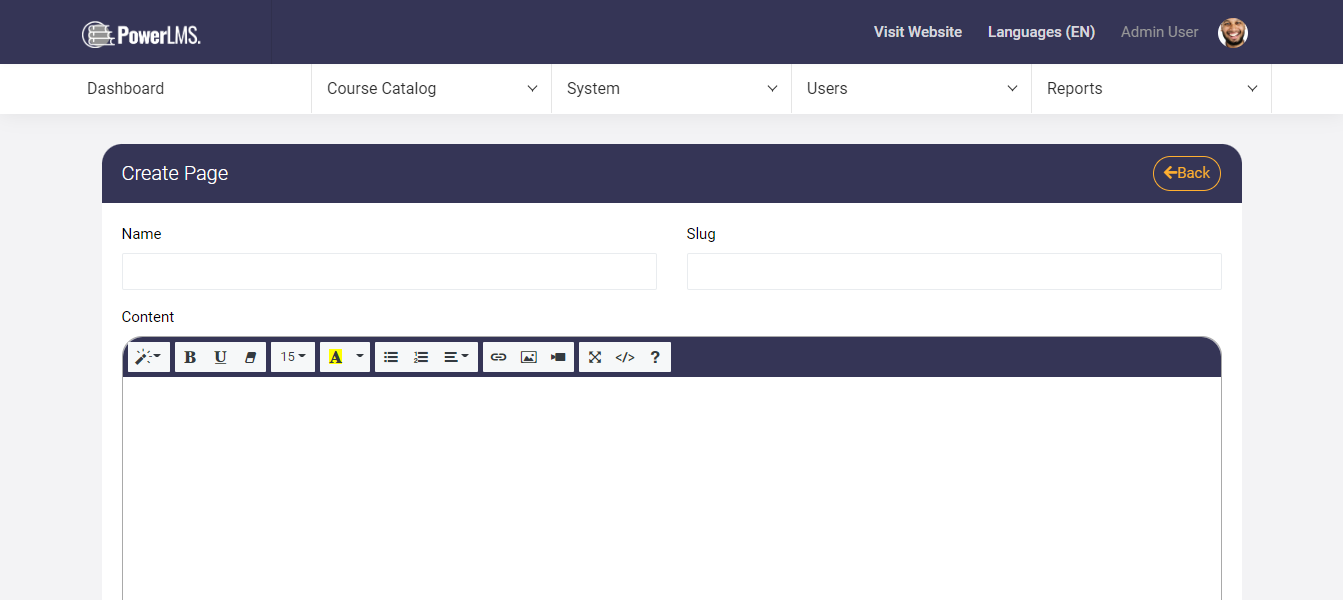
3. Pages
This is an independent CRUD. The basic requirements to create a Page will be the name and the content of the page. The created page title will be available at the footer.
4. Configurations
It consists of five different tabs containing important user interface settings as well as mail and payment settings.
- General
- Layouts
- Logos
- Mail configurations
- Language settings
- Payment settings
- Social settings
- SEO information
Let's understand this one by one.
a). General
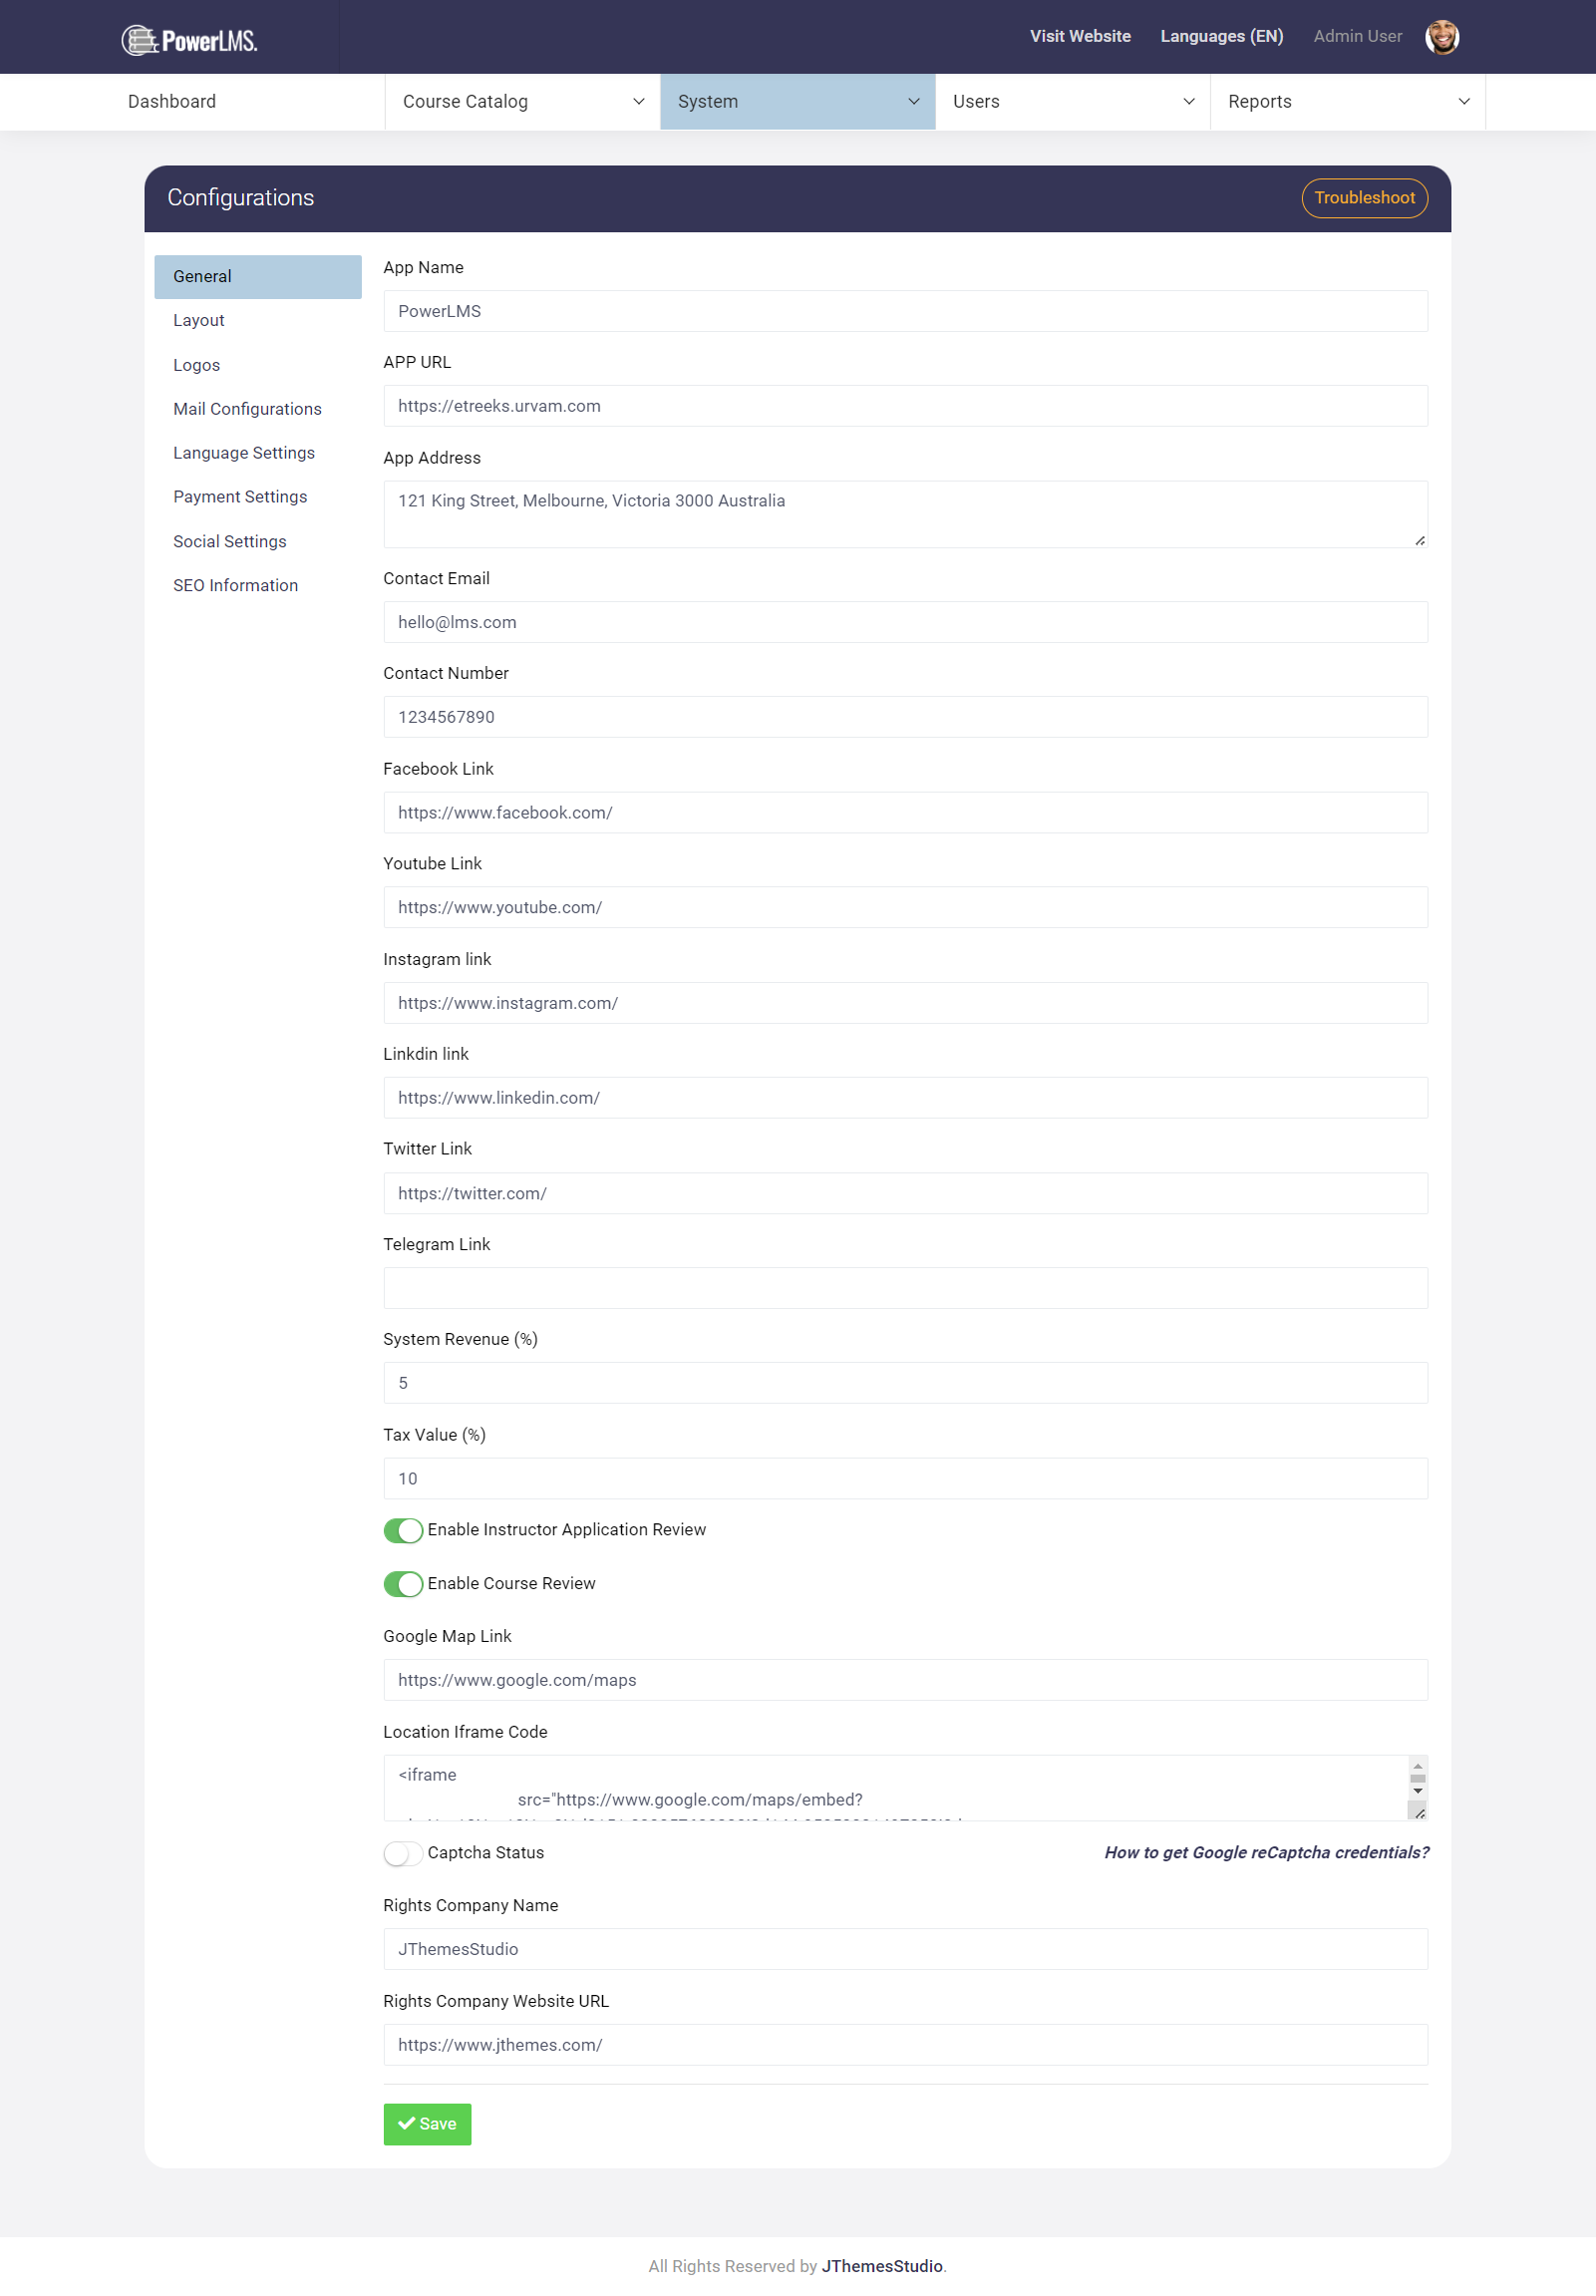
App Name content pending
App URL content pending
Contact Email is used in official email communication.
Contact number is used in official correspondence.
Facebook link is used for the official account on facebook.
Youtube link is used for the official account on youtube.
Instagram link is used for the official account on instagram.
Linkedin link is used for the official account on Linkedin.
Twitter link is used for the official twitter account.
Telegram link content pending
System Revenue(%) represents the revenue generated by the system from a course.
Tax value (%) represents the revenue generated by the course and the revenue earned by the system.
Location iFrame is used to display the location on a mini-map.
Captcha Status will allow users/instructors/admins to avoid spamming in login as well as registration.
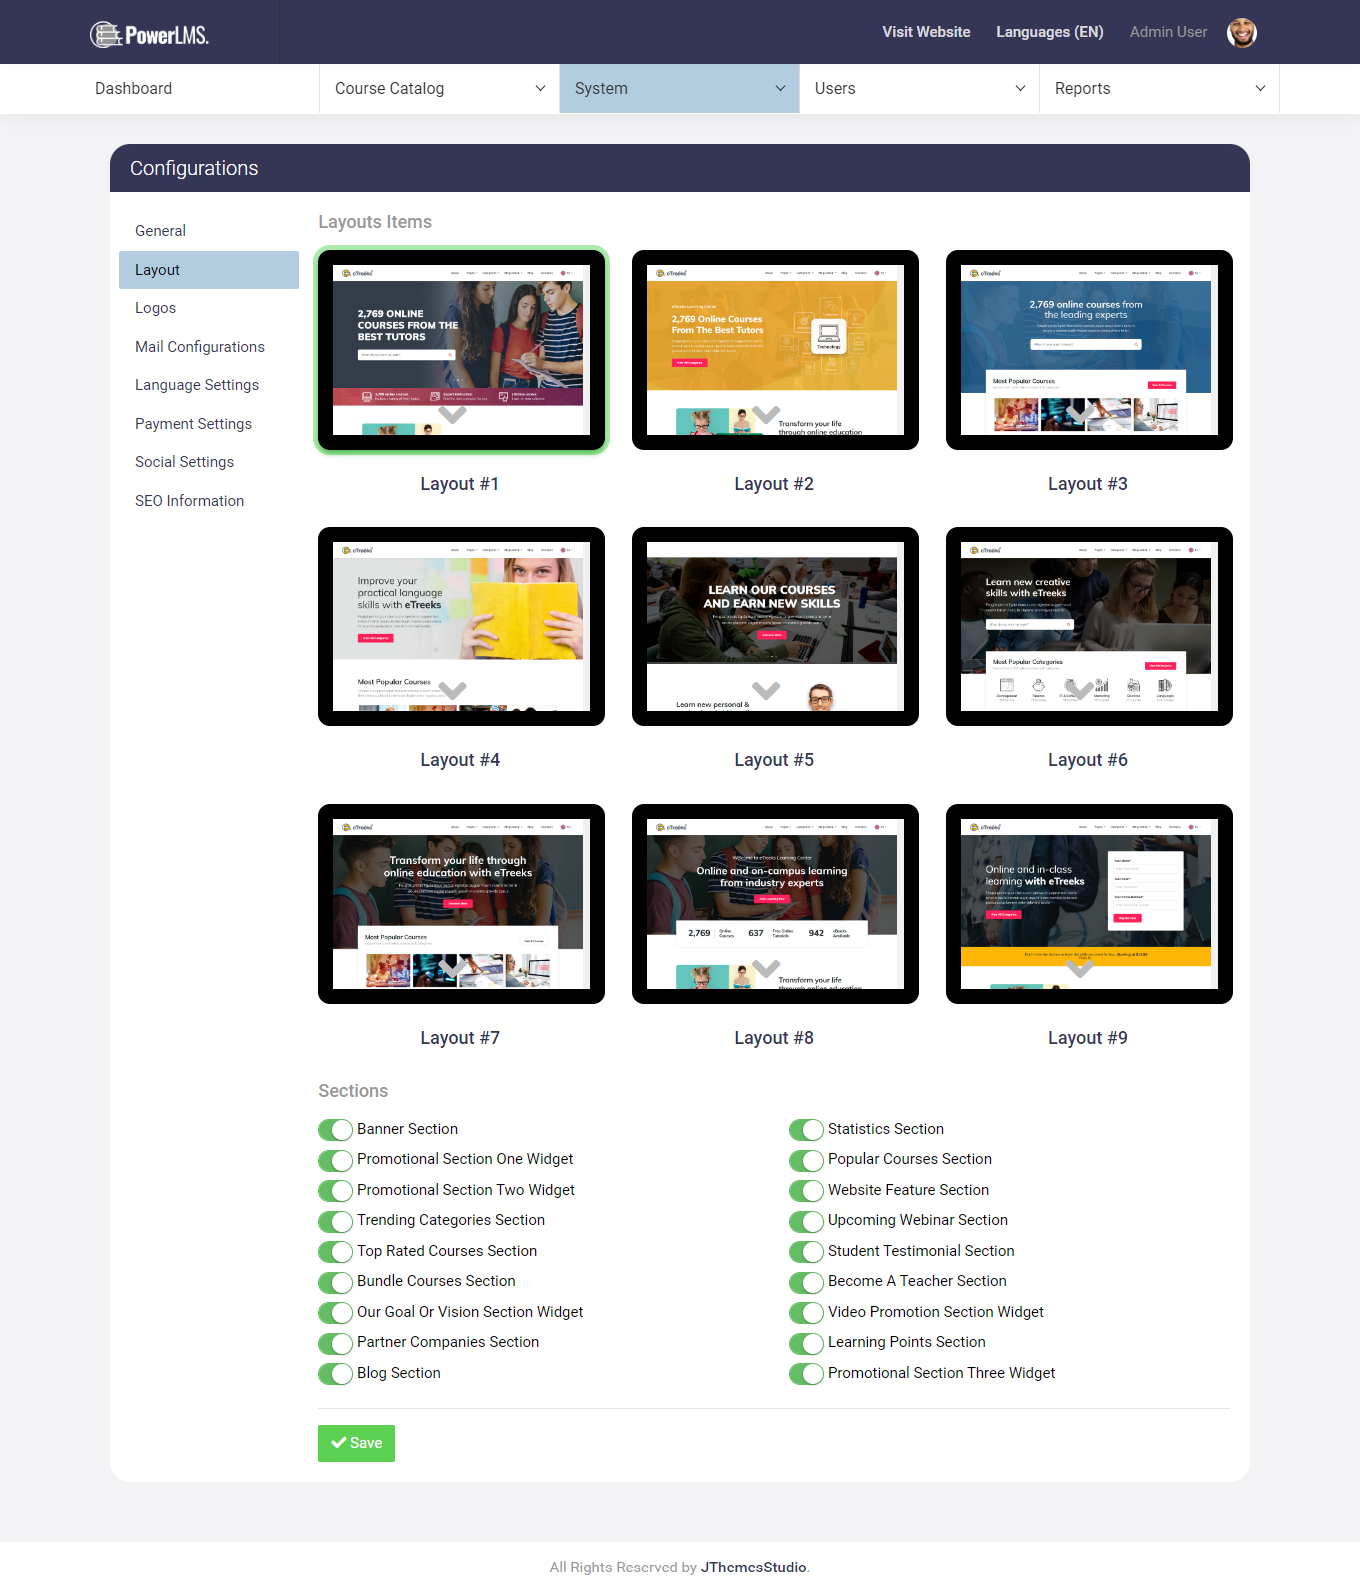
b). Layouts
This is one of the best features brought to you by this theme. Admin can select from 9 different layouts and control the visibility of the sections available in that layout.
c). Logos
If you want to upload your custom logo then please follow the instructions given below each logo. For better results in all the layouts please upload all three types of logos as given in the snapshot. The Favicon will be used to display in the web browser as your symbol.
d). Mail configurations
This will be used to make email communication work. Because without Mail
Configuration
you will not be able to send or receive emails regarding this.
Example: Forget Password Emails, Leads Emails, etc.
You can use any Mail service provider you want. As it is a Laravel Application configure and search it according to the Laravel setup
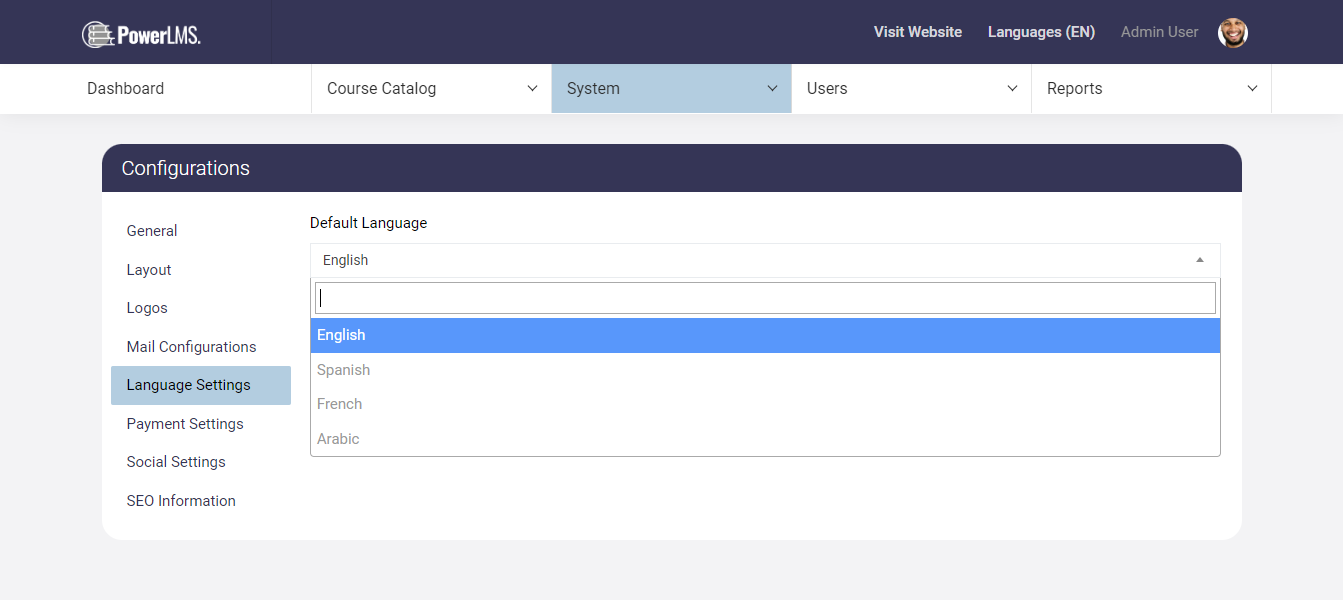
e). Language settings
We are supporting multiple languages for users. Here you can select the default language for the website and layout for the same. There are currently four languages available: English, Spanish, French, and Arabic.
f). Payment settings
We are presenting you with dynamic payment methods for your website. And you can also select currencies from the list in which you will be able to deal with the purchases. You can enable/disable payment methods you want to show while the user checks out after adding items to the cart. The only payment methods enabled in the dashboard will be displayed while the user checks out.
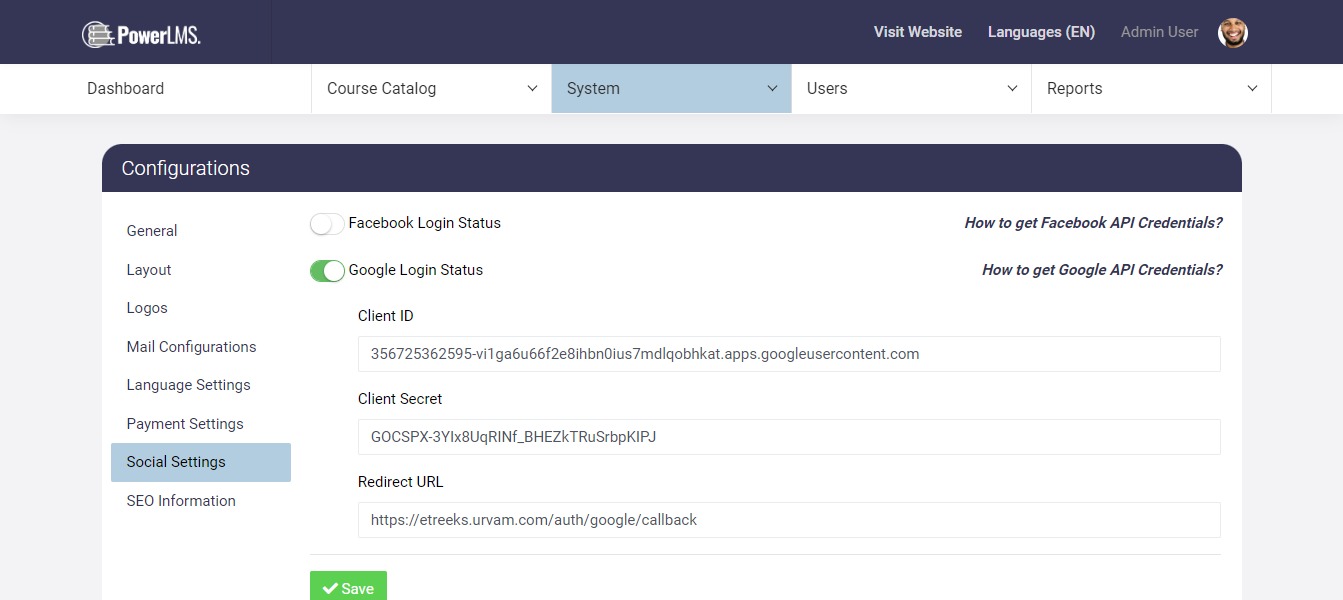
g). Social settings
We are providing you with the three most trending social login features including Facebook, and Google. Only enabled social login providers will be displayed in the login popup. To configure social login, you need to add API credentials for the respective social login provider.
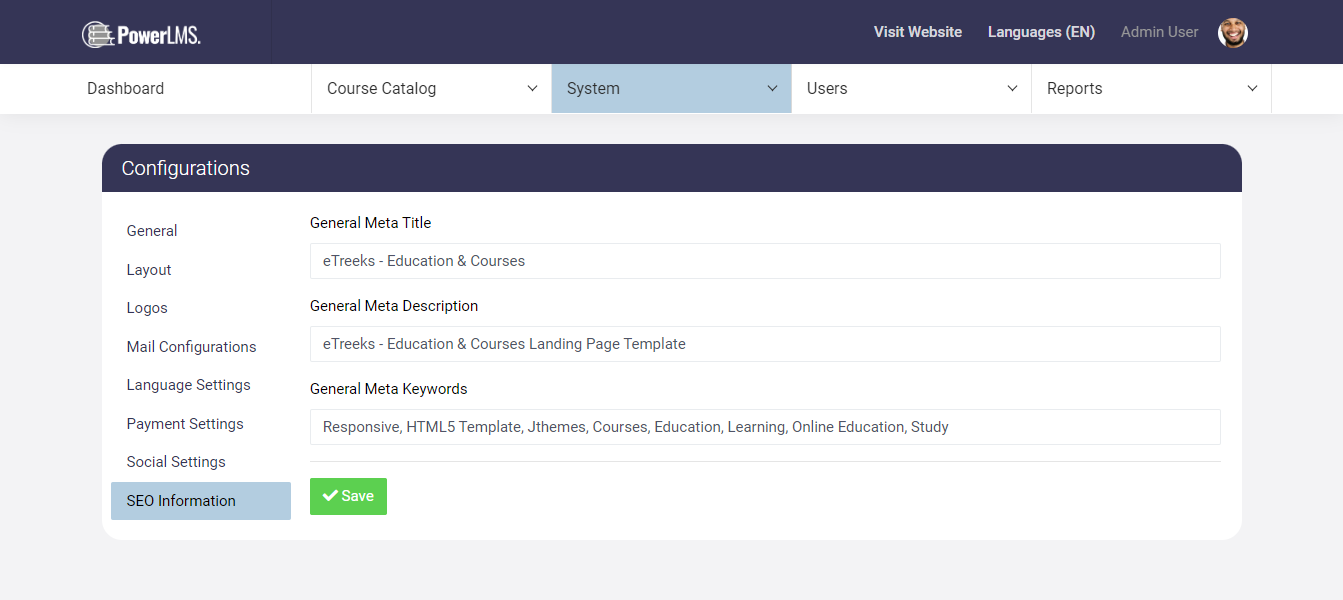
h). SEO information
You can also add Meta Title, Meta Description, and Meta Keywords for better SEO Results for all the pages.
5. Translation Manager
It helps you in managing locales of the website. Here you can see list off all the languages file. You can edit, update and delete them. You can also create new locale. Means you can add new language. We are giving by default three locales with theme; English, Spanish, French and Arabic. You can also update those files if you think this is not a right translation.
If you click on Choose groups and it does not show any option. Then click on Import Groups button. By that all the locale files will be added to the website and you will see list of files in choose group. If you select a group from the list, you will be redirected to view/edit page.
If you want to update any of the language translation, just click on it and an editor will be opened. Edit it and click on save. Now If you want to publish this change then click on Publish Translations from above area and your translation would be applied to your live site.
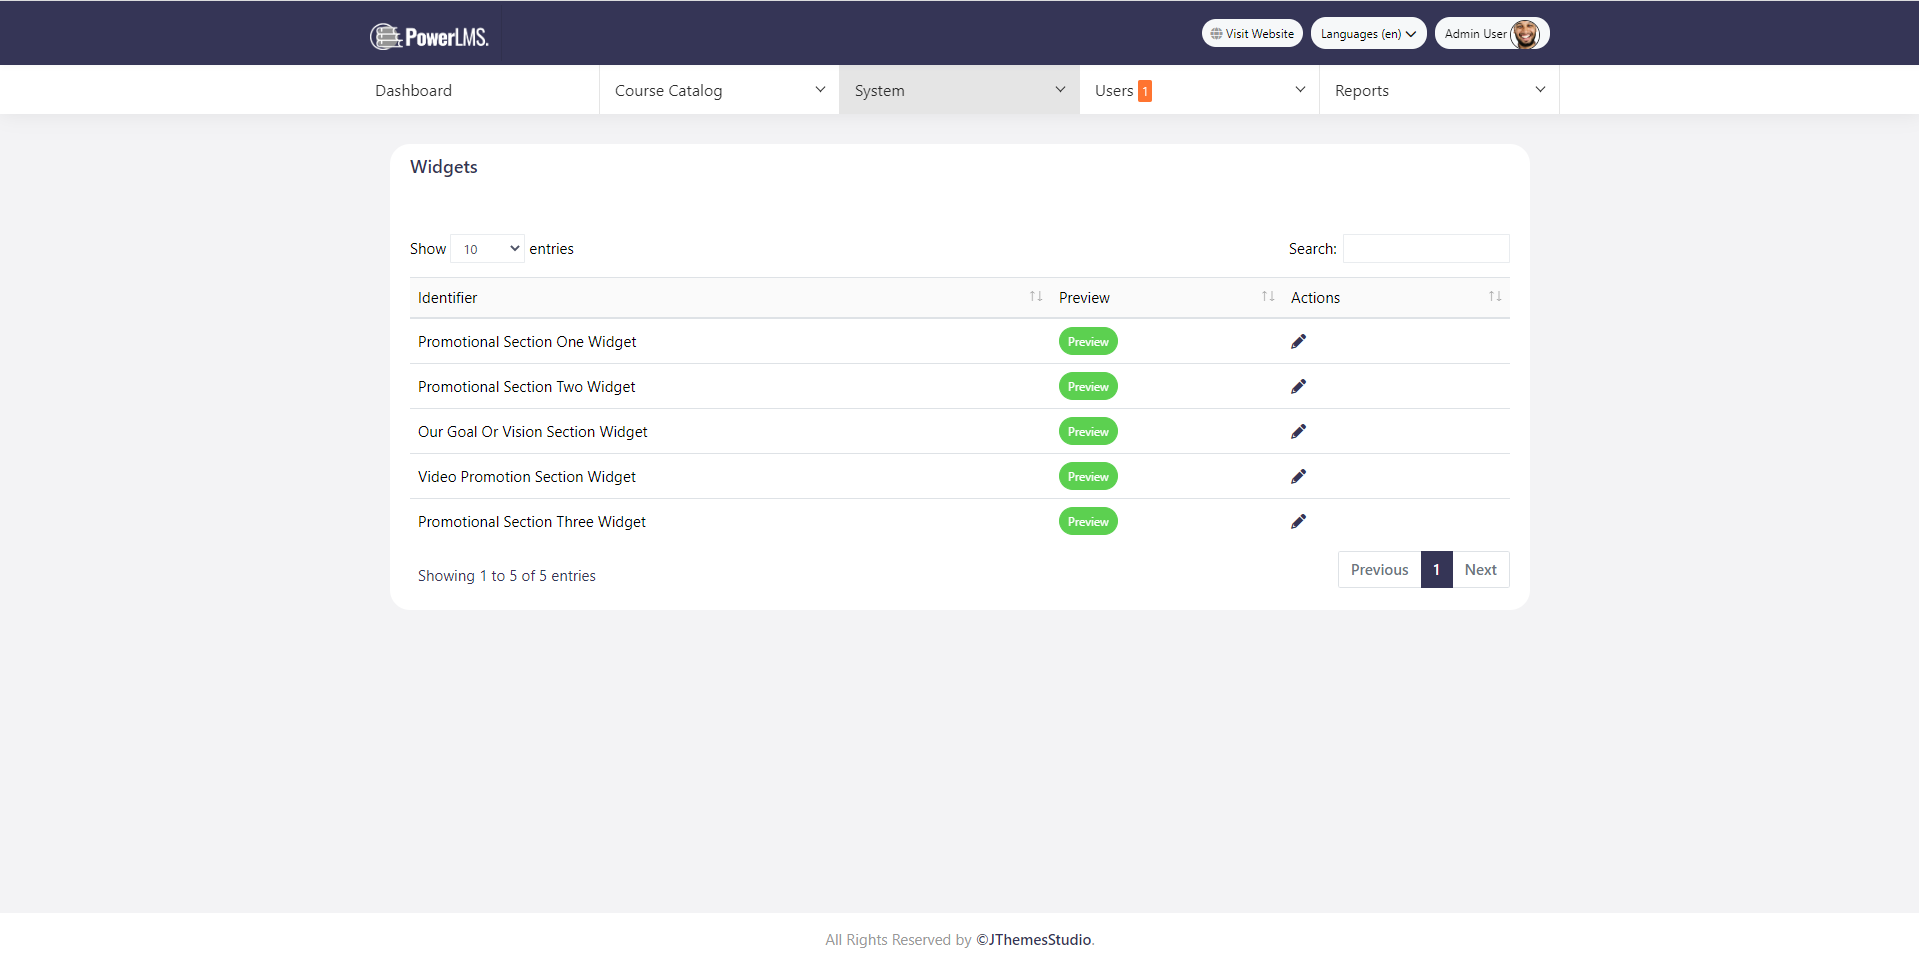
6. Widget
Admin can control all the website Widgets like Promotional Section, Our Goal Or Vision Section, Video Promotion Section.
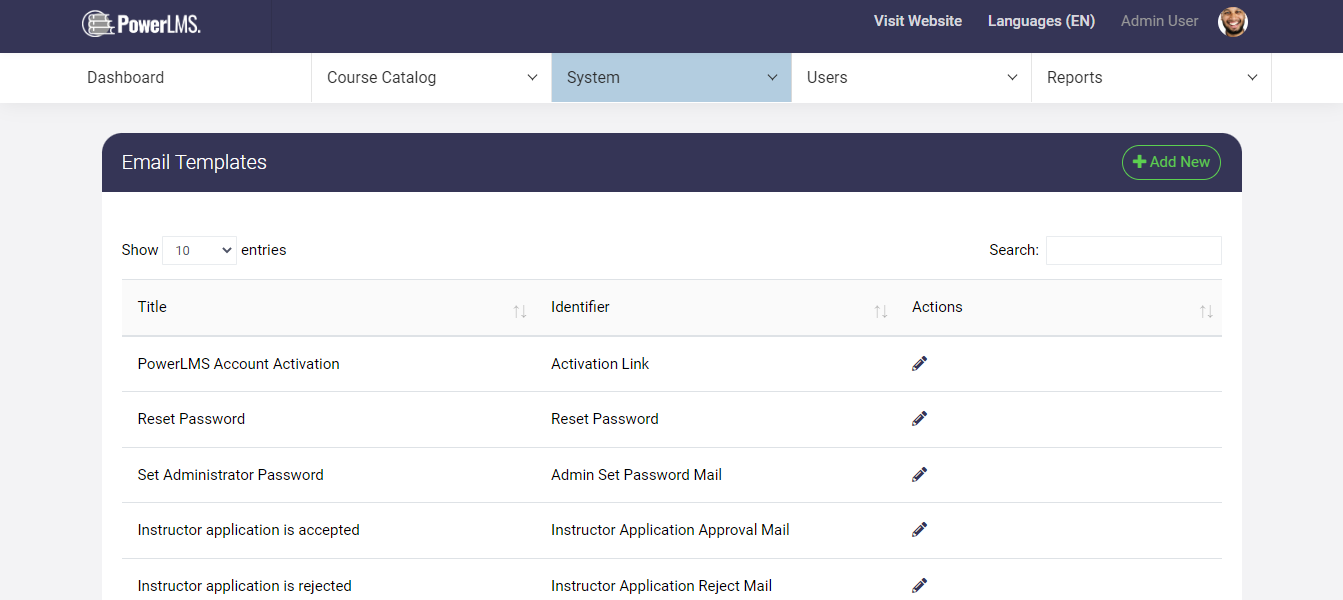
7. Email Templates
You can create a template here if you want to send beautiful emails. As per the email actions, emails will be sent to users.
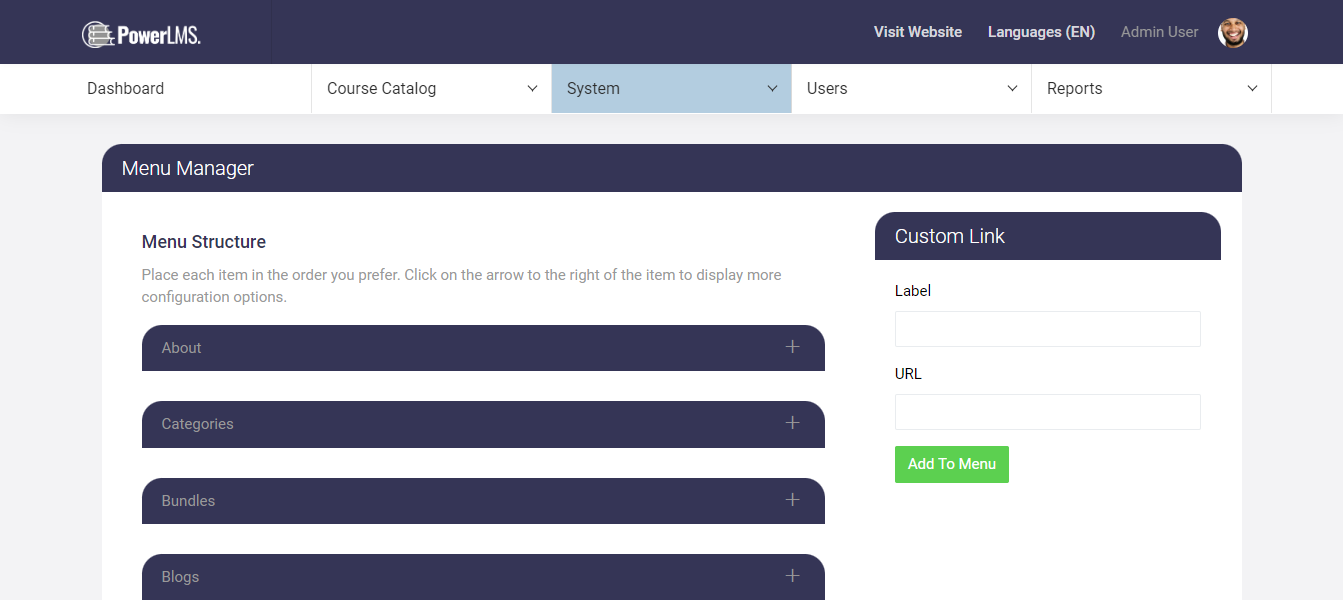
8. Menu Manager
Fully featured menu manager like wordpress. Add custom links and custom pages as Menu. Create multiple menus and set it as Top Menu. Draggable menu structure for sorting, Custom labels and links. You can customise it according to your requirements.
Menu translation feature is also available. Once you add the menu here in english. Go to the Translation Manager and select the Frontend group. Your added menus will be added in your default translation with prefix nav.custom_menu_item.{MENU}. Once you've added all the translation click on Publish button.
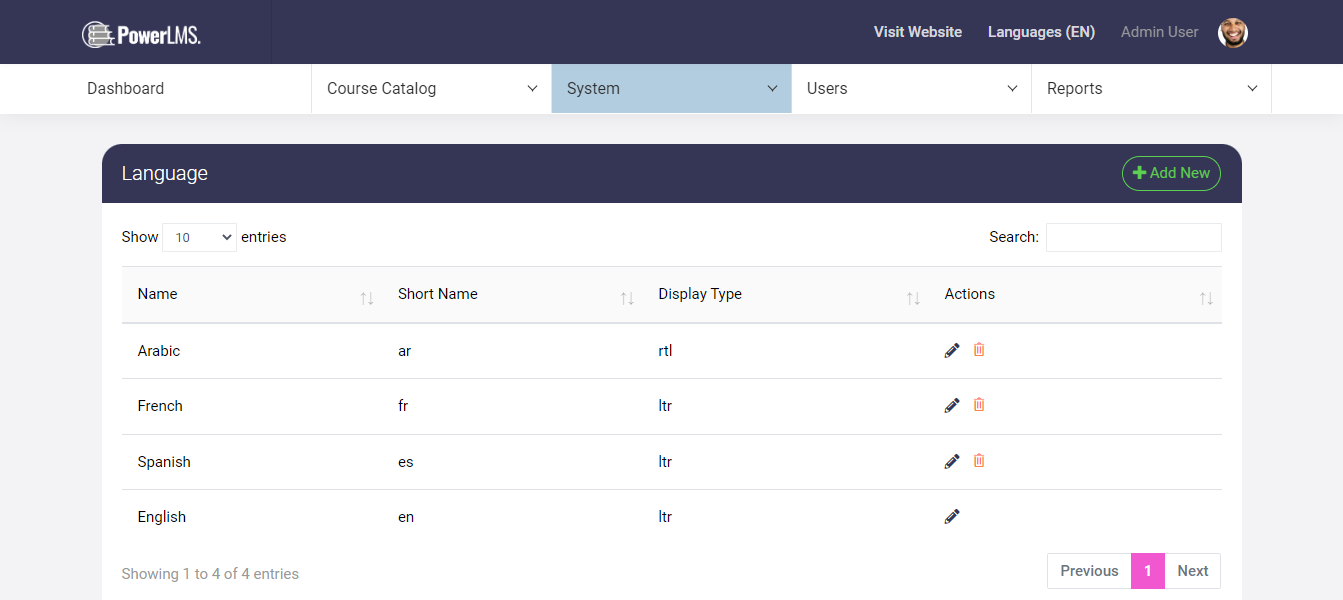
9. Languages
This is a complete CRUD for the languages. The basic required details for the language will be language name, Short Name, and Text direction.
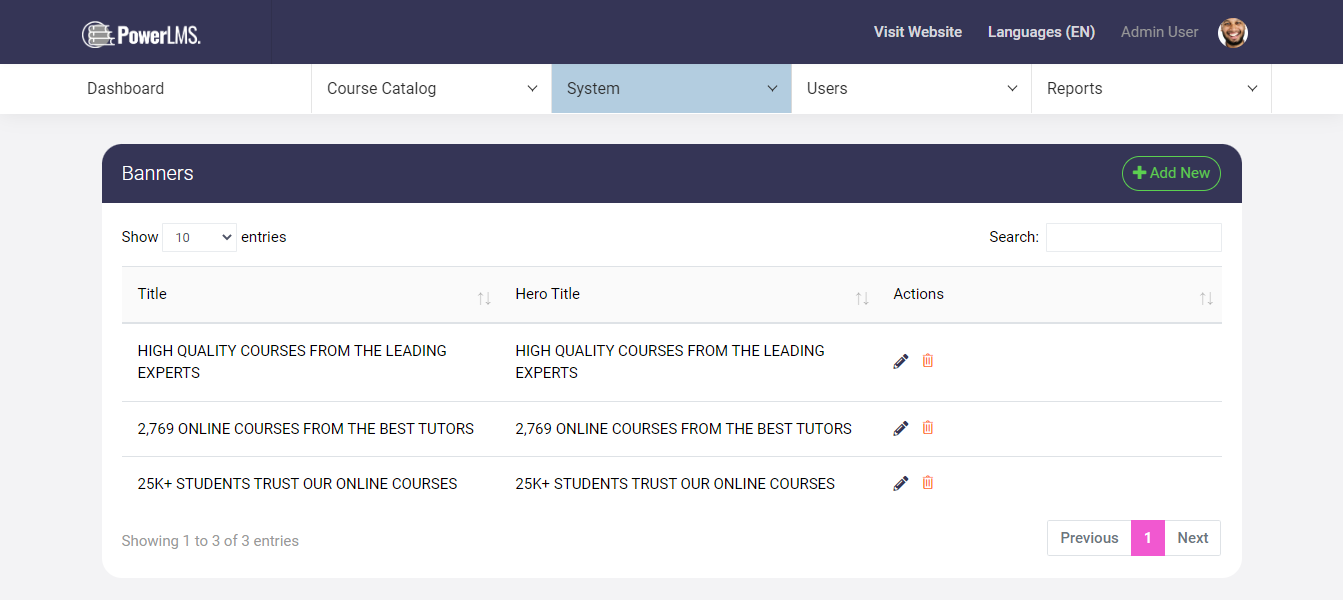
10. Banners
Customizable slider is one of the unique feature we provide for this theme. You can create, edit, update and delete as many slides as you want and add various widgets to it. You can add Buttons, Search box, Countdown timer etc.
Here is the picture of a slide from Homepage Slider
11. Sponsors
This is a complete CRUD for the Sponsors. The basic required details for the Sponsor will be title of Sponsor, url of the sponsors web, and sponsors image.
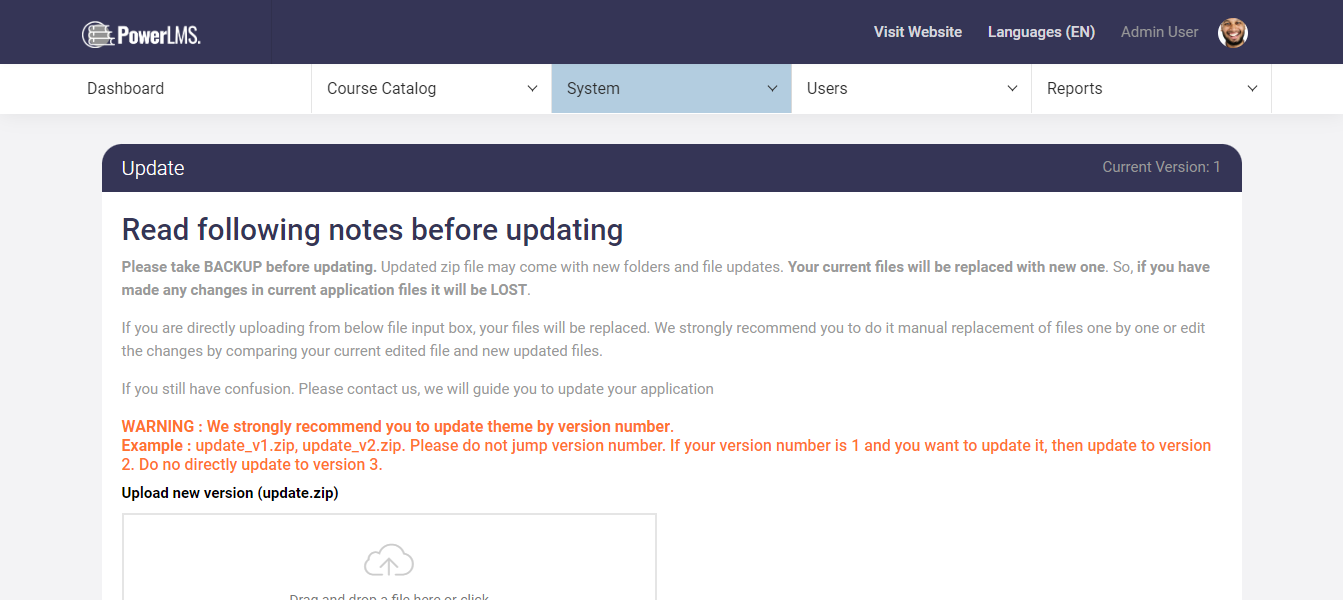
12. Update
If you have made changes in application files and want to update theme, then unzip update.zip in your local and compare files, update or make changes in your files one by one. So that you can have your custom files as well as new update changes.
We strongly recommend you to update theme by version number. Example : update_v1.zip, update_v2.zip. Please do not jump version number. If your version number is 1 and you want to update it, then update to version 2. Do not directly update to version 3.
13. Backup
For data security Backup plays important role. Suppose if there is any consequences in your website and you lose your data, then this backup will help you. We have added backup feature. All you need to do is follow simple steps; your backup will be automatically taken according to your choice and will be saved in your project Backup directory /storage/app/{Your APP_NAME}.
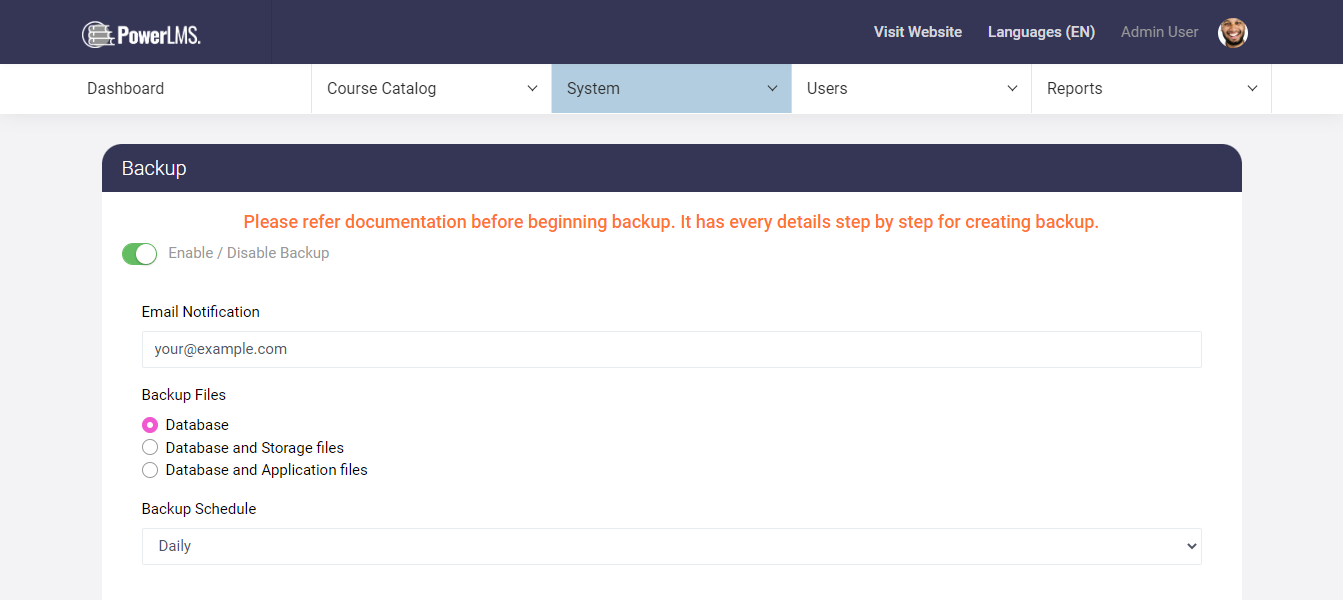
You can schedule backup in daily,weekly and monthly basis. Besides this you can also specify that what do you want to backup. Like, only database, database - storage files (it includes all the images data of users) and database - application files (entire website data)
You will be notified every time on your email when your backup is generated and saved. You need to add your email id here to receive backup notification. You can also Enable / Disable backup as if you want to backup your application or not.
Users
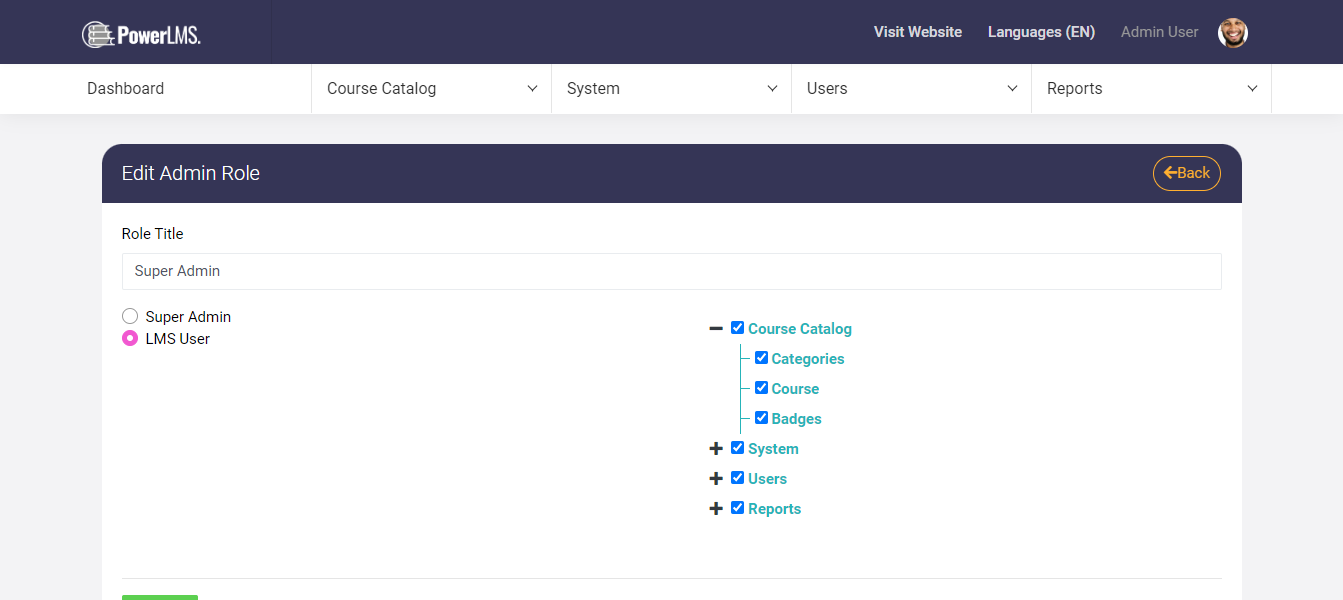
Here Admin can create, and manage users and their roles. And Admin can also assign permissions to roles.
It has three submenus
- Admin
- Instructor
- Students
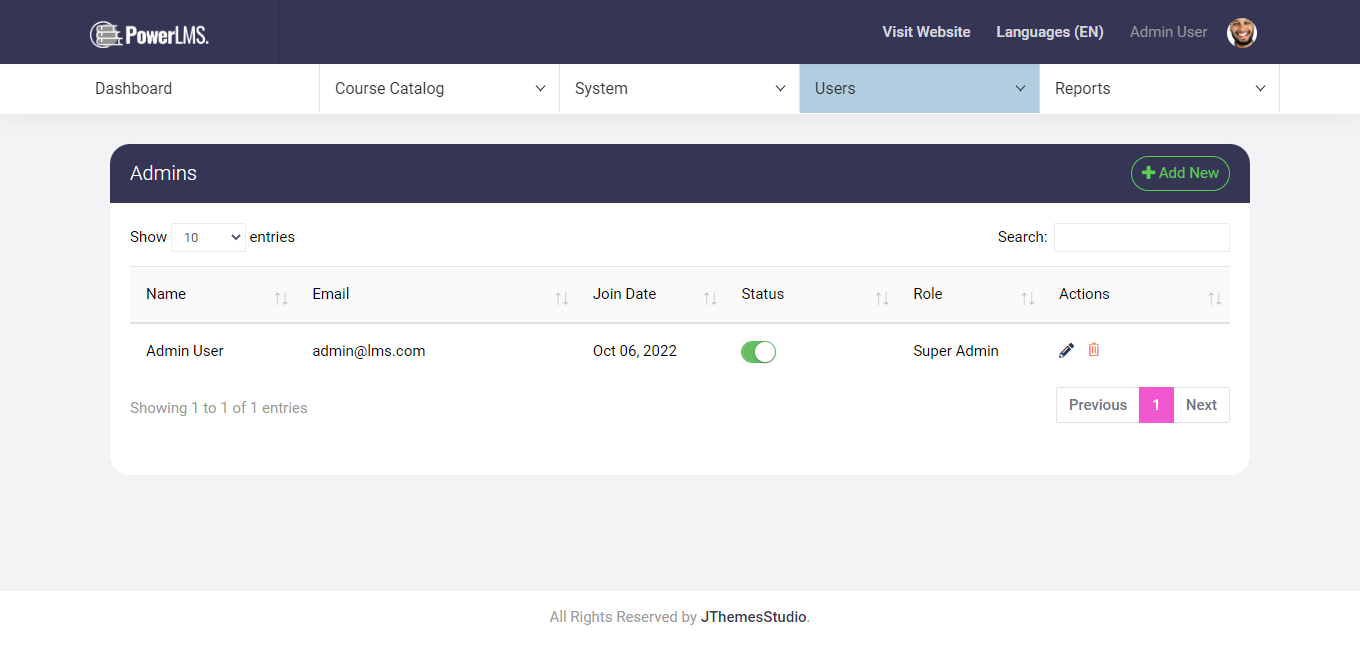
1. Admin
Here Admin can create, edit, update and delete admins and assign their particular roles.
2. Instructor
Here Admin can create, edit, update and deactivate an Instructors account. Admin can accept or reject Instructor requests also.
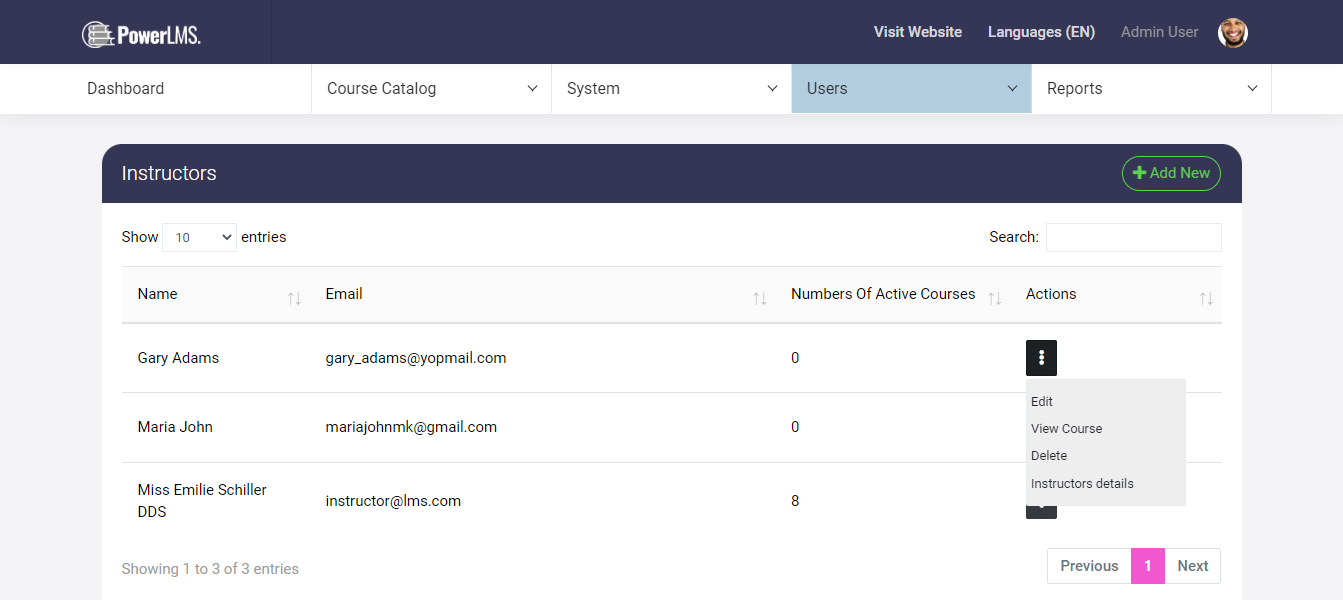
Clicking on the Admin can view the courses list uploaded by the particular instructor, update instructor profile data, delete the instructor data

If the Enable Course review toggle button is enabled then after creating the course instructor can directly publish the course.
You can also set system review for each instructor separately bu turning on the Change Default System Revenue toggle button and setting up the System Revenue percentage.
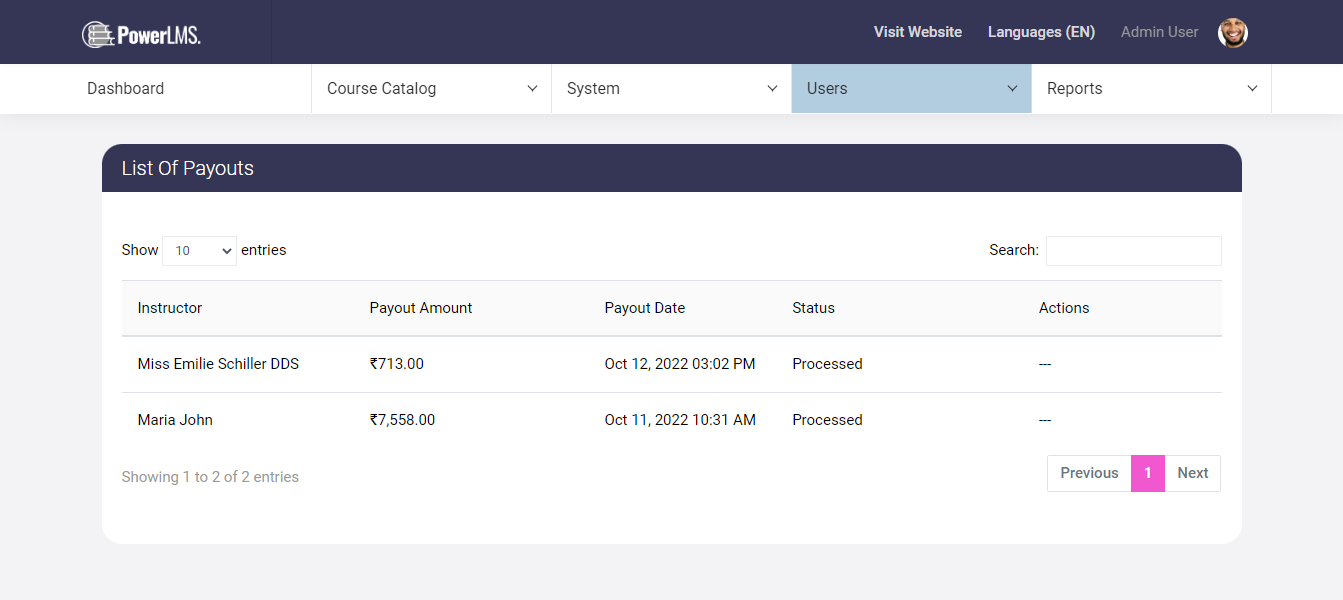
Instructor Payout
List of all the payment requests by the instructors from the amount earned as a commission from courses / bundles sold will be displayed in this menu. Admin can approve / reject the requests.
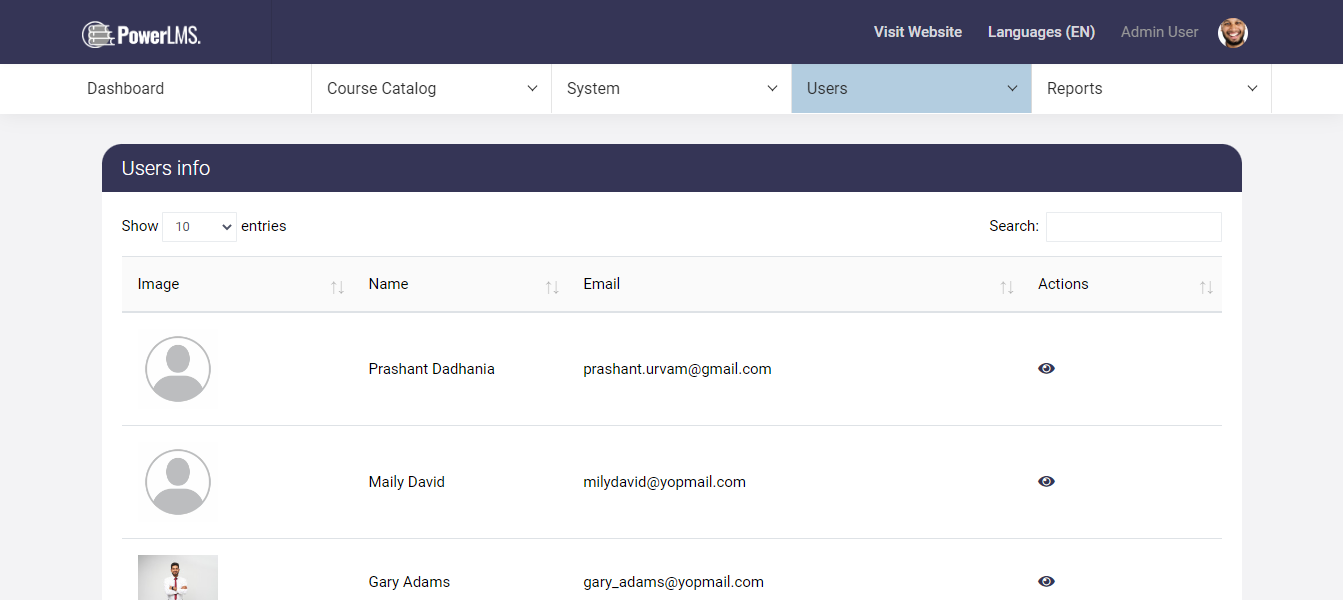
3.Students
In this section, Admin can find information about each student's account details like name, email id, and profile image. By clicking on the admin can see the Student's info, enrolled courses, and progress.
Reports
There are three reports available.
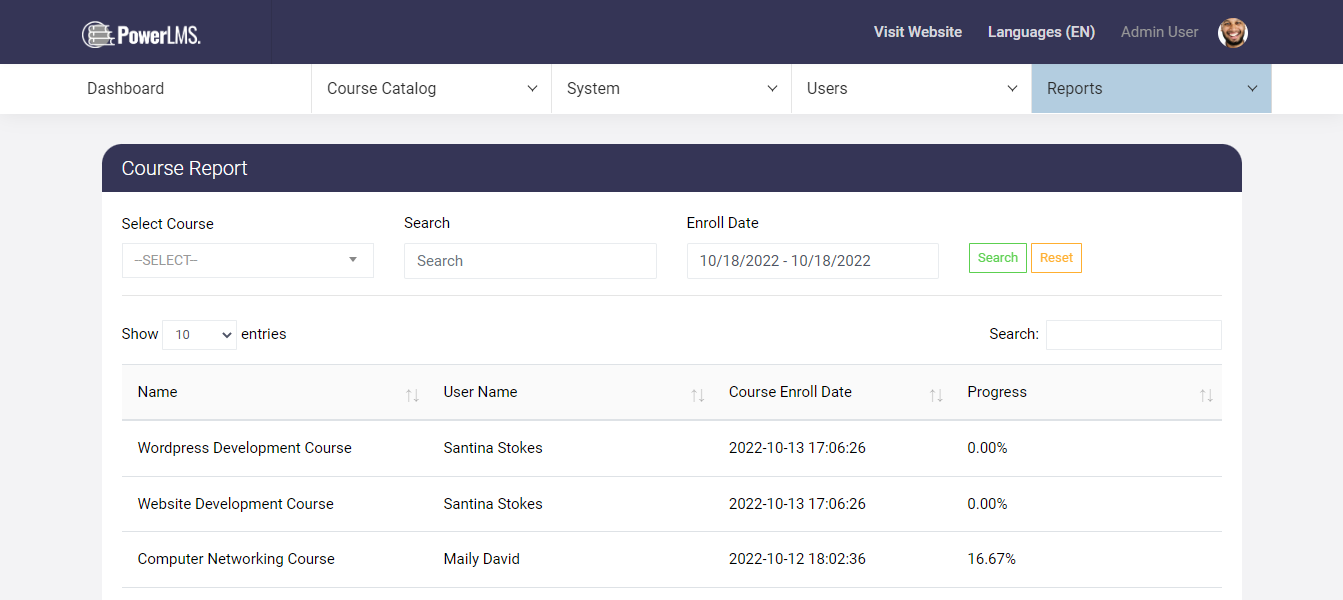
1. Course Report
The admin can see the course name, the name of enrolled users, the date the course was enrolled, and the percentage of the course progress.
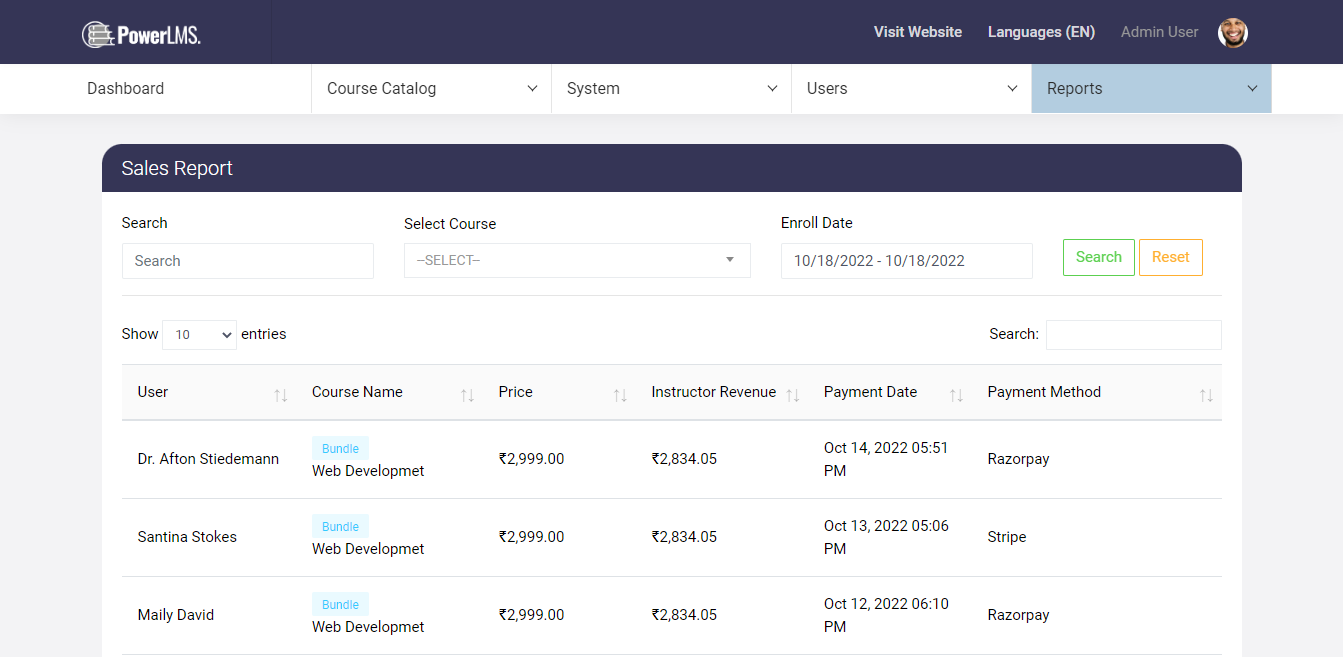
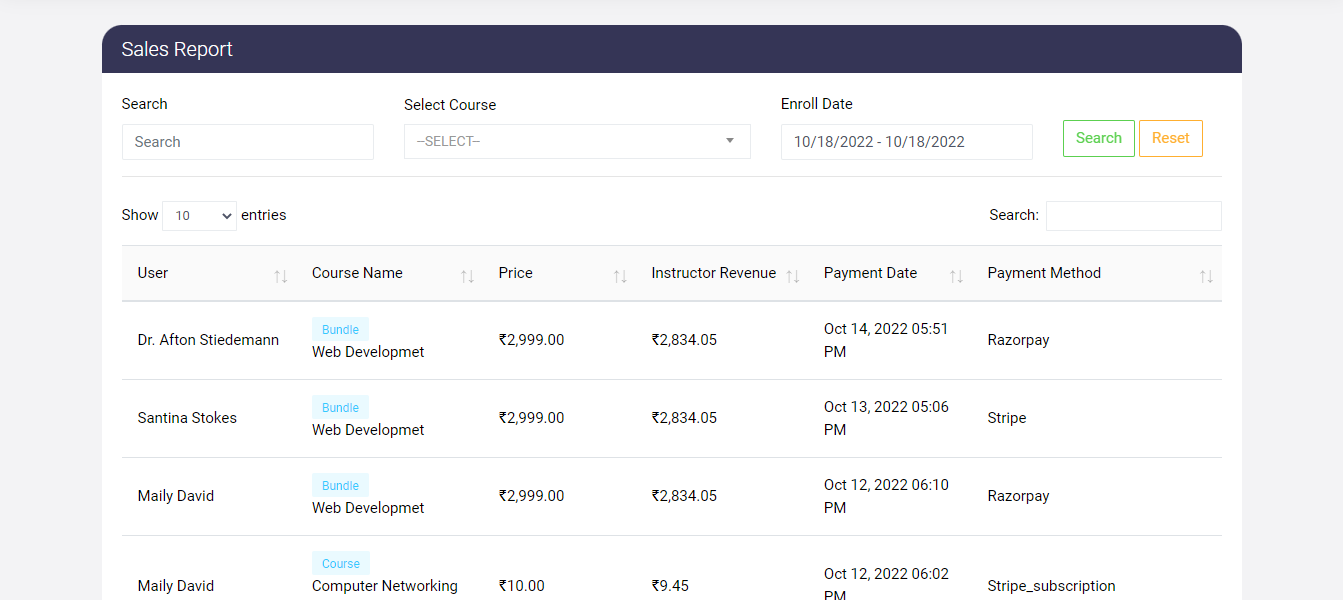
2. Sales Report
The admin can see the user names, course names, price of the course, instructor revenue, payment date, and payment method.
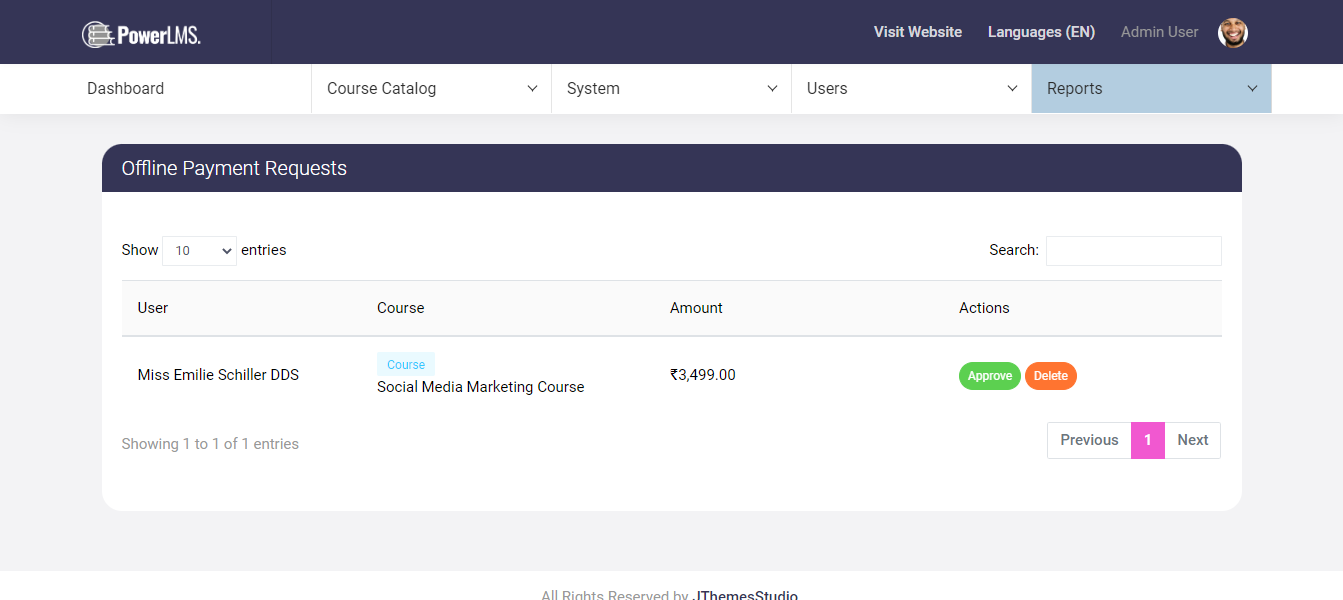
3. Offline Payment Request
Where instructors can find a list of courses in which how many students are enrolled and how many of them have completed the course.
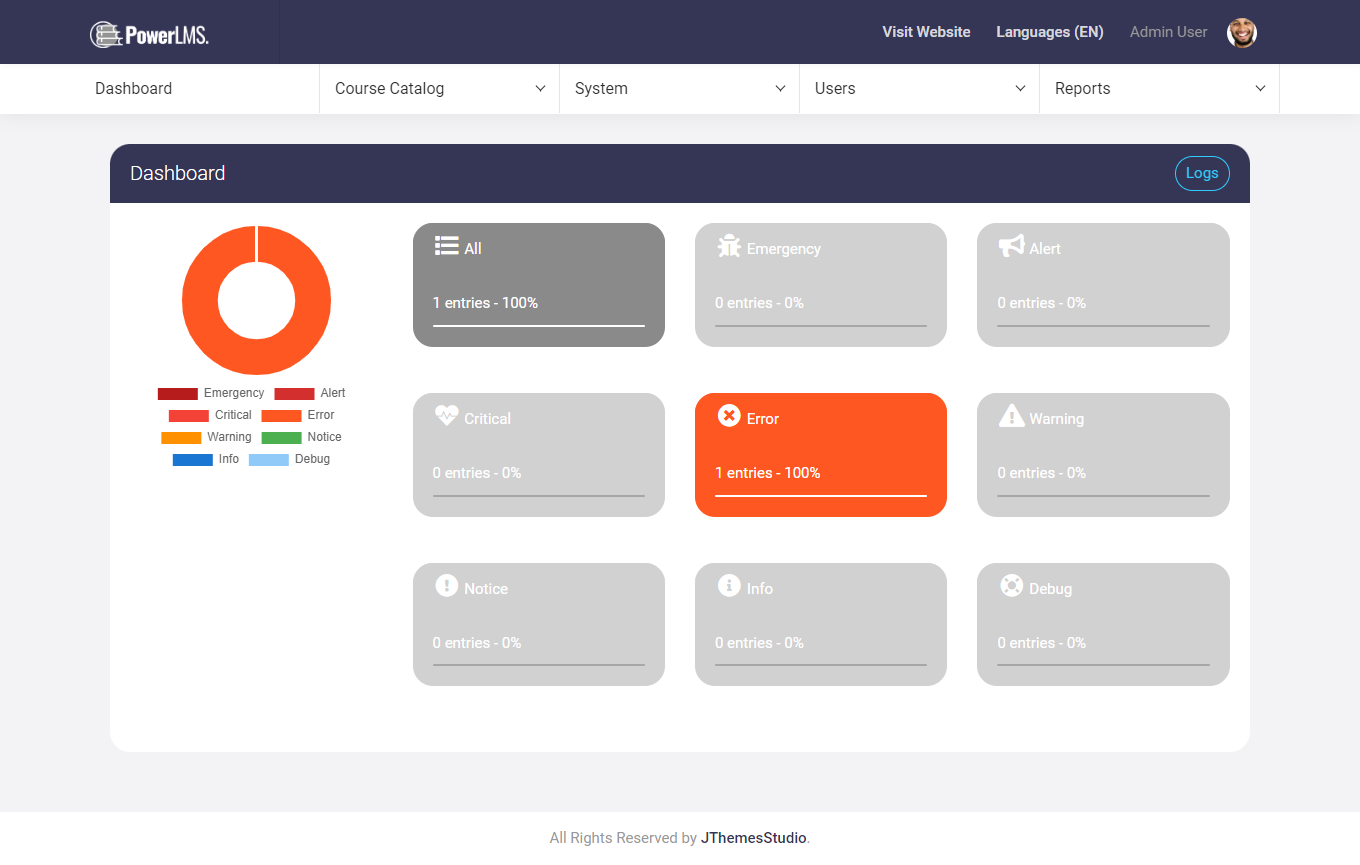
Log Manager
You will find this feature under the profile icon. This is site debugger tool. Where you can watch out current condition of your website. Like errors, warning alerts and all.
Besides this you can also check and download errors logs. And can also view it in details.
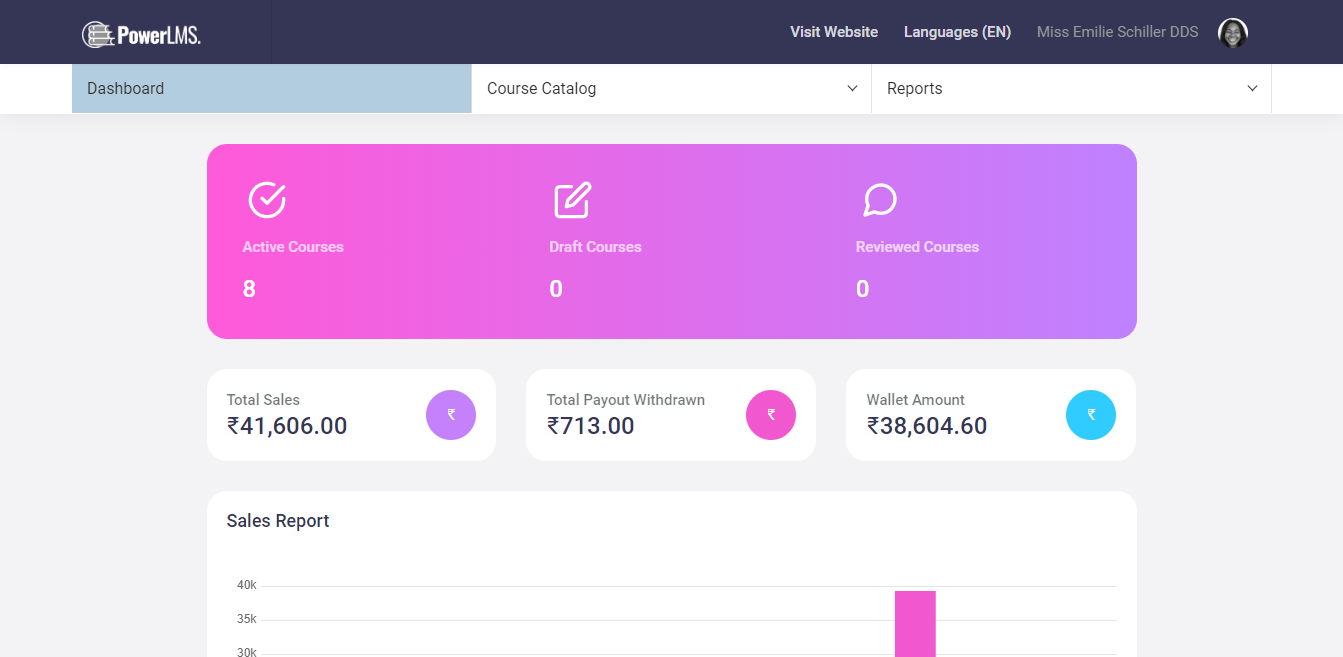
Dashboard
On the dashboard, the you can see the statistics of
- Active Courses
- Draft Courses
- Reviewed courses
- Total Sales
- Total Payout Withdrawn
- Wallet Amount
Course Catalog
It consists of nine submenus for the Instructor.
- Courses
- Lessons
- Chapters
- Tests
- FAQs
- Bundles
- Live Lessons
- Live Lesson Slots
- Webinar
1. Courses
From the courses screen, you will get to know the course's names, course categories, total Lessons and chapters of the course, price, and status of the course (if it's active or submitted for review).
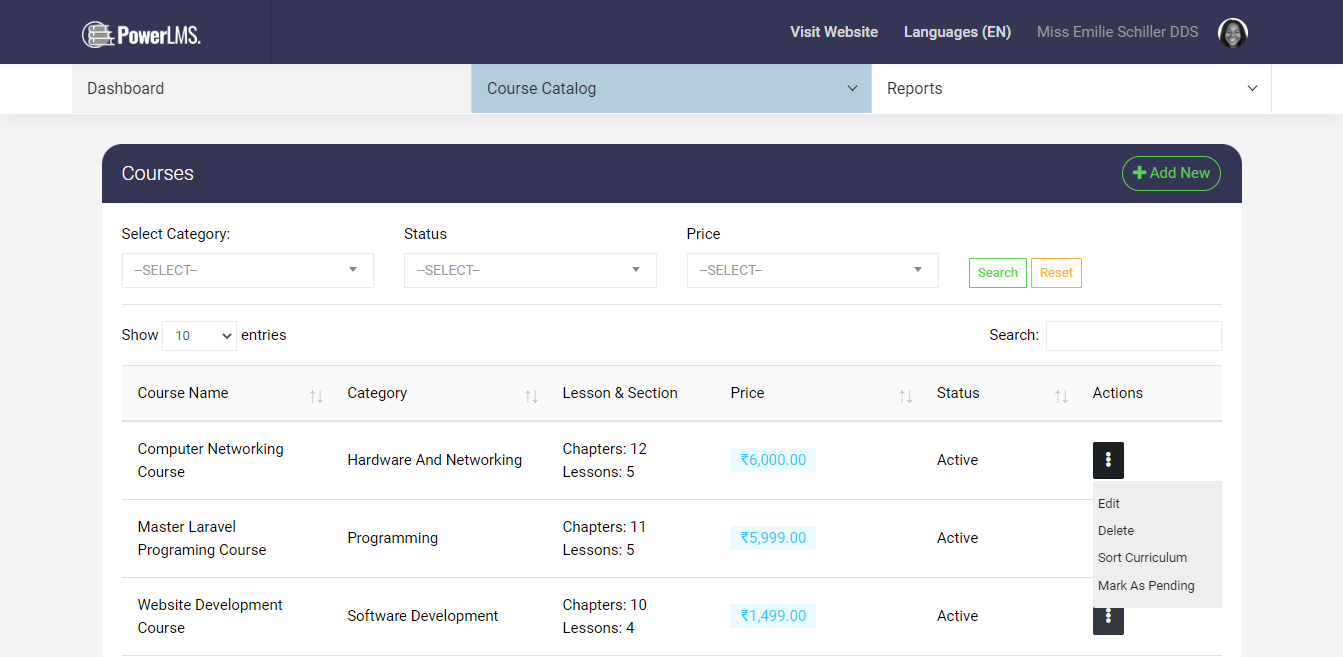
By clicking on
, you can edit, delete, sort the curriculum and submit
the course for review.
Once the course is created, by clicking on the sort curriculum, you can see the
course curriculum details. It will list the lessons and the chapters of the course.
You
can drag and move them to arrange in a custom order and click on save. So when a
user
sees this course it will show all course-related chapters and tests in that
particular
sequence.
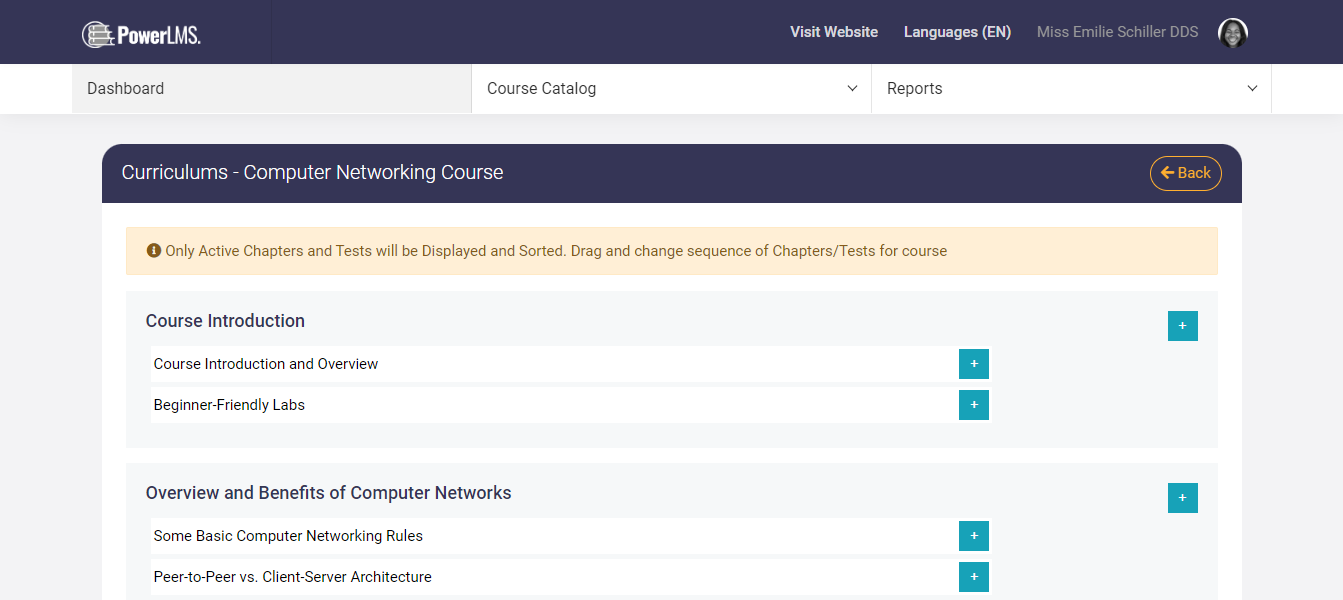
As you can see above, you can easily sort course components according to your requirements.
The combination of chapters and tests is a course. The basic flow would be like this:
- Create Course
- Create Chapters for the Course
- Add Tests (If required)
- Add Faqs (If test created)
You can also add Meta Title, Meta Description, Meta Keywords, Schema, and Canonical URL for better SEO Results. You can also add an introductory video of the Course. You can choose from various options like embed Youtube, Vimeo, Iframe, or upload your own.
As soon as the course is created, it will be sent for review by the instructor. Admins will manually publish the course on the web after reviewing it.
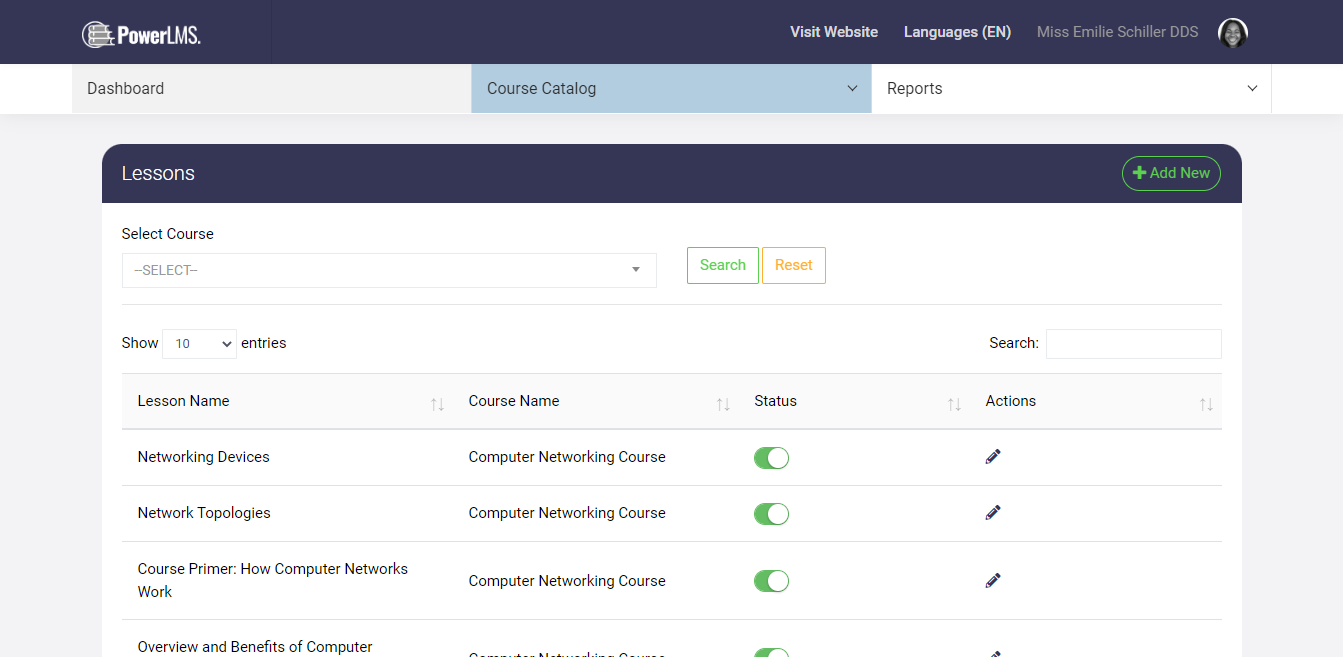
2. Lessons
This page allows you to add, update, activate, or deactivate lessons of courses.
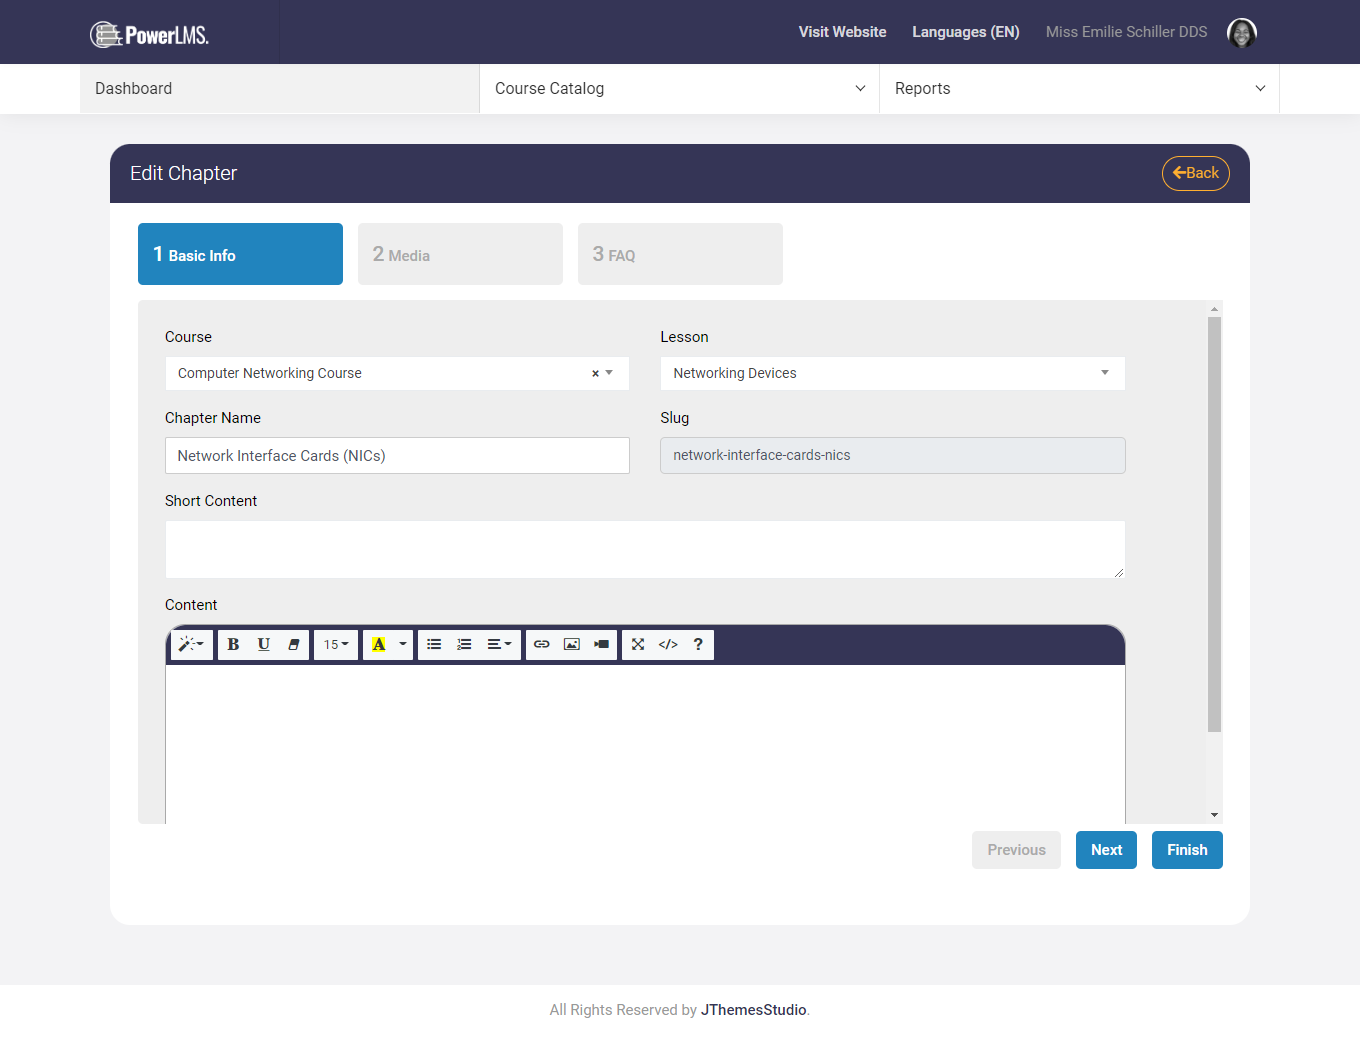
3. Chapters
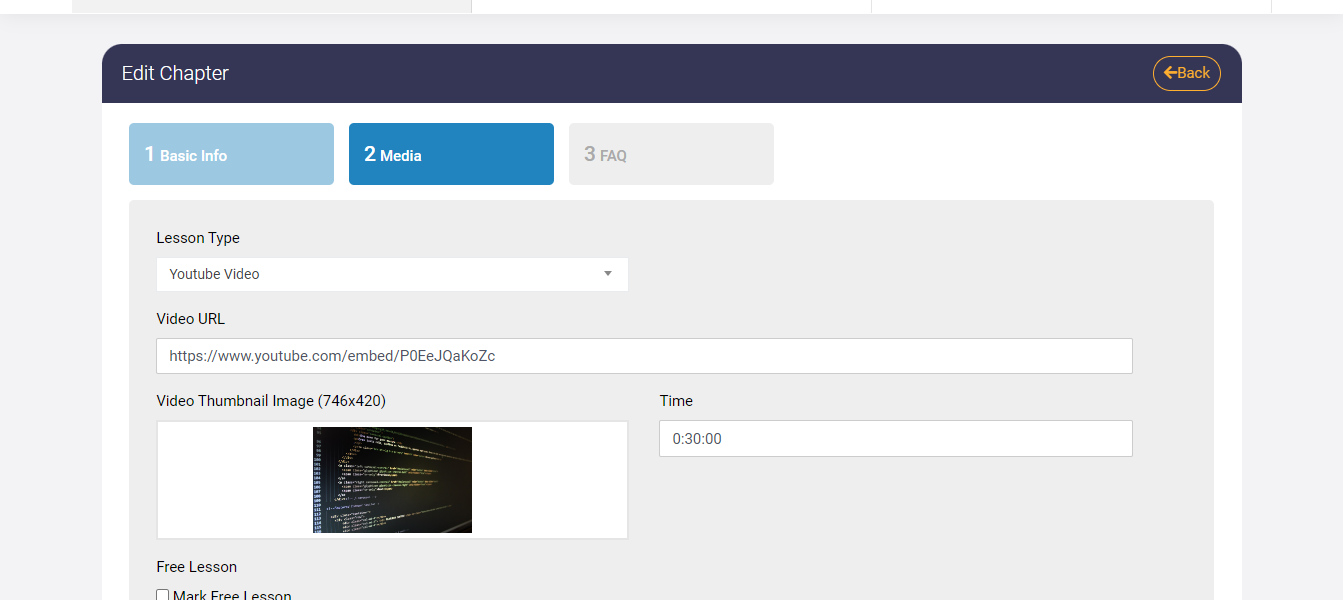
You can add chapters to courses. In Chapters, you can add Featured Image, Downloadable Files, Videos, etc.
You can also show PDFs to users. Just upload a PDF and it will be displayed on the chapters screen.
How to add videos in chapters?
Youtube: Go to Youtube -> Go to the video you want to display -> click on the share button below the video. Copy that link and paste it into the text input
Vimeo: Go to Vimeo -> Go to the video you want to display -> click on the share button and copy-paste the video url text input Upload: Upload mp4 file in file input
4. Test
You can create, edit, and delete a quiz. The basic requirement to create a test is course, Lessons, test name, time, total marks, retake count, and content.
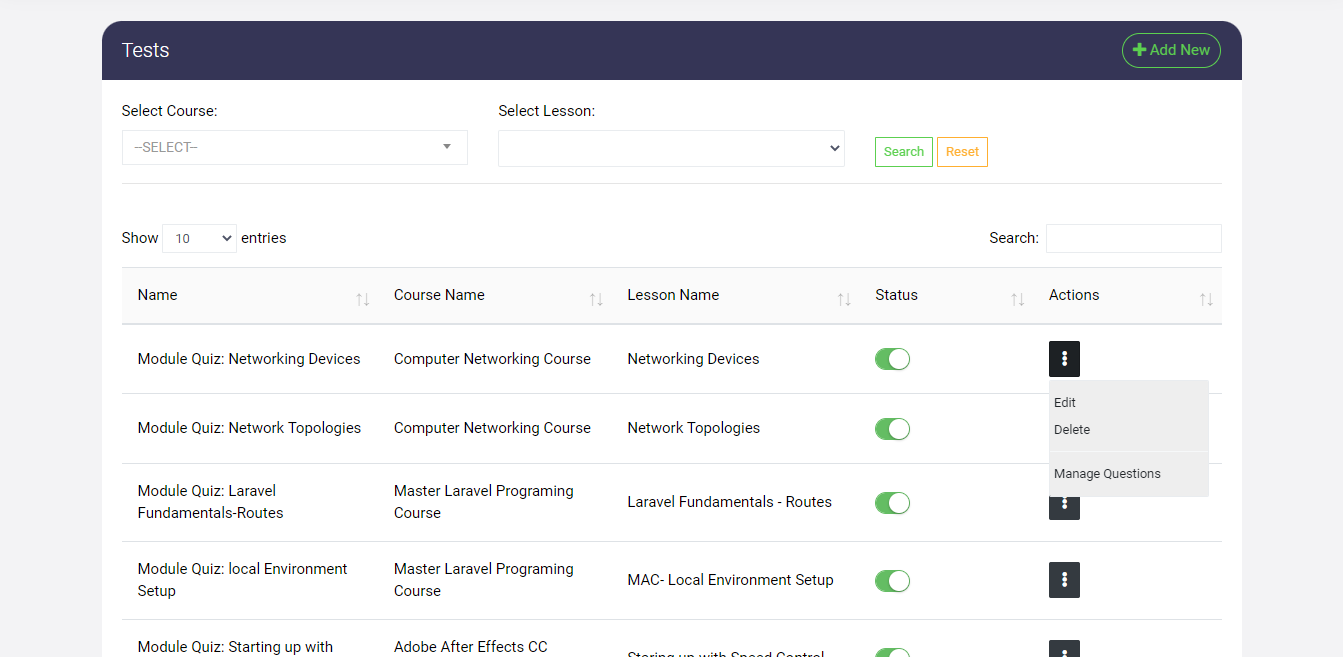
By clicking on you can edit, delete, and manage the questions.
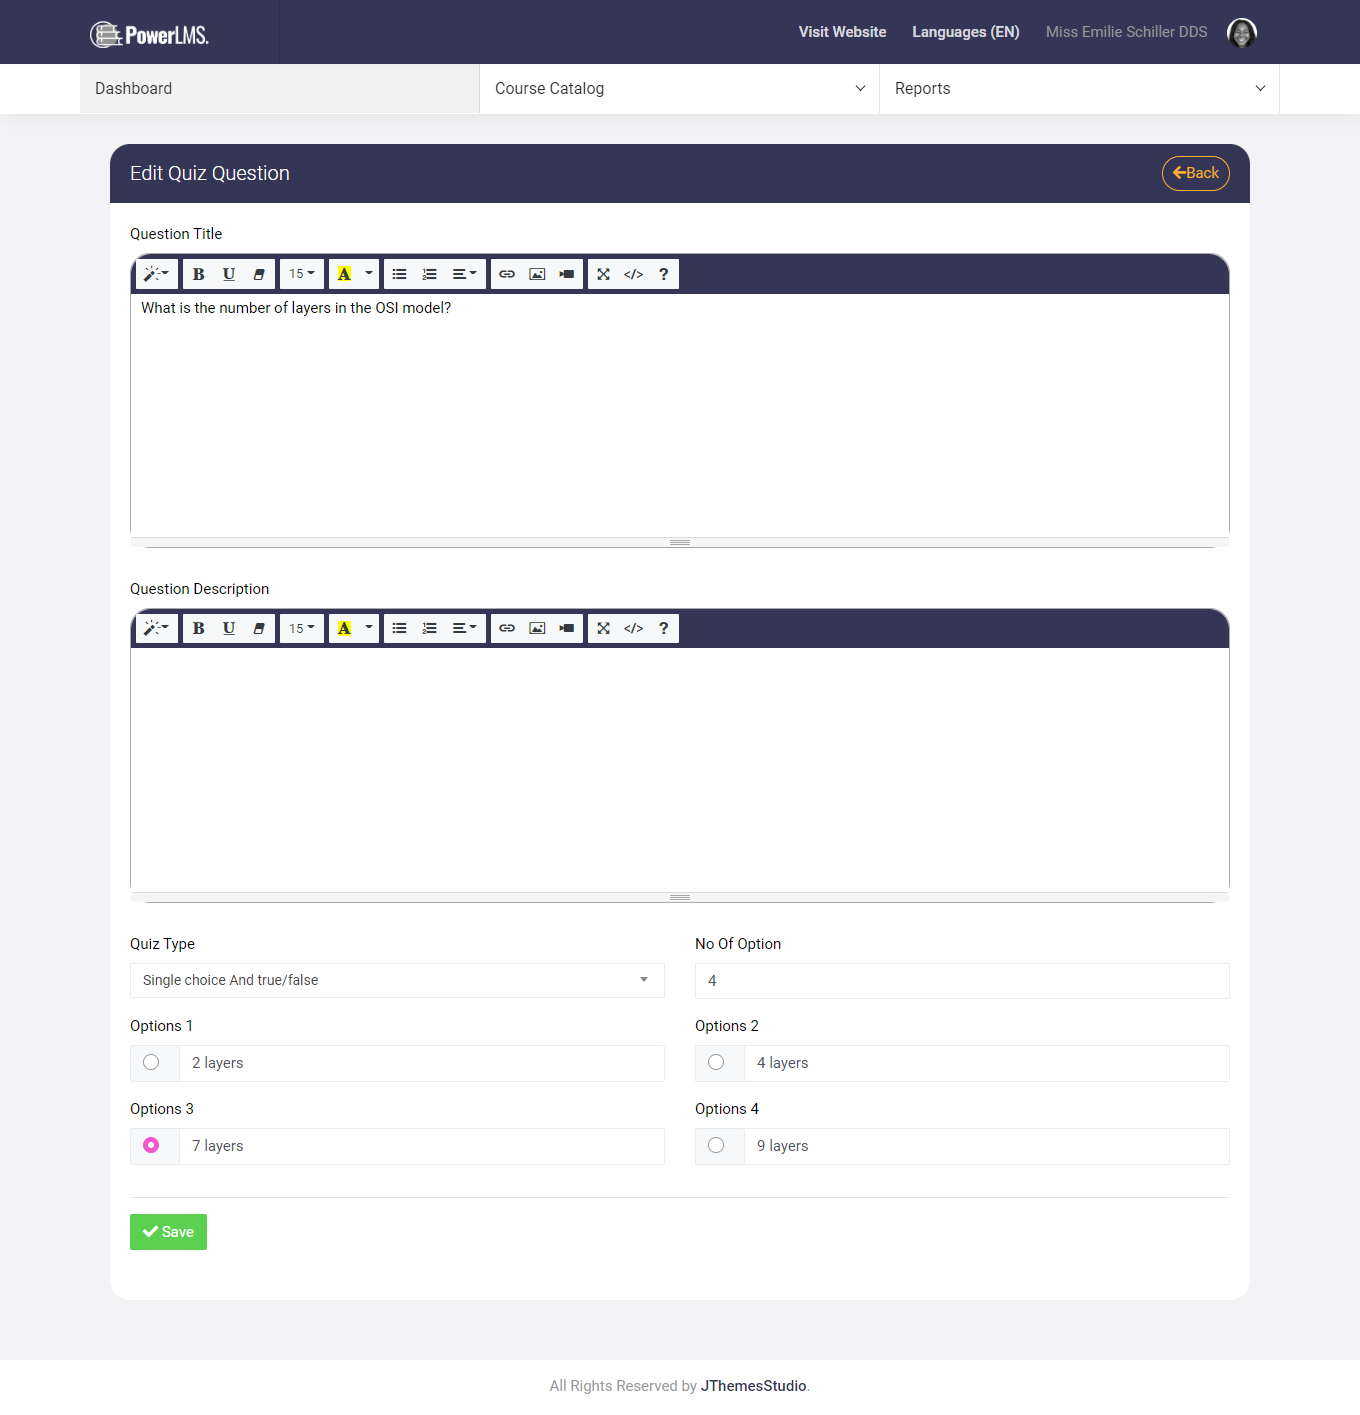
On manage questions, you can add edit, and delete questions. The basic requirement to create a question is the question title, question description, quiz type, number of options, and the options. To mark the answer, you need to check on the options checkbox.
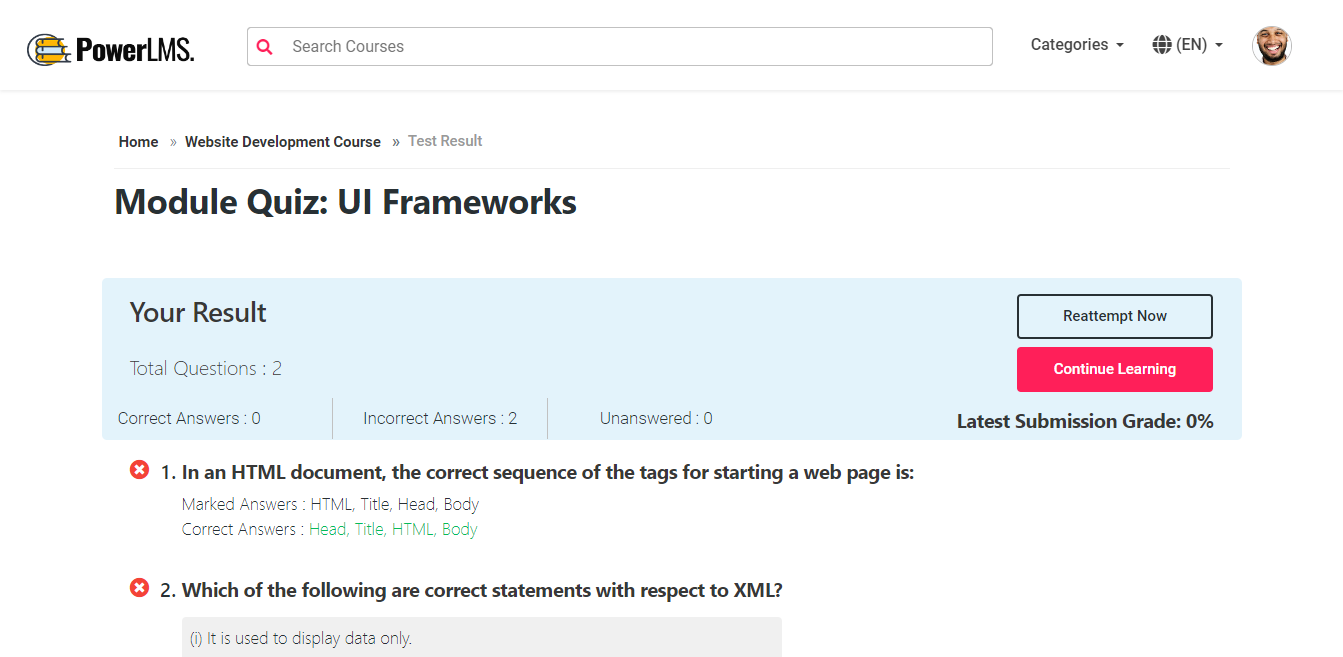
On the front end, students need to check the checkbox, for which one is correct. The best part is, that when a student gives a test, he gets an instant result. And if he is not satisfied with his result then he can give it again. Result sample will look like this :
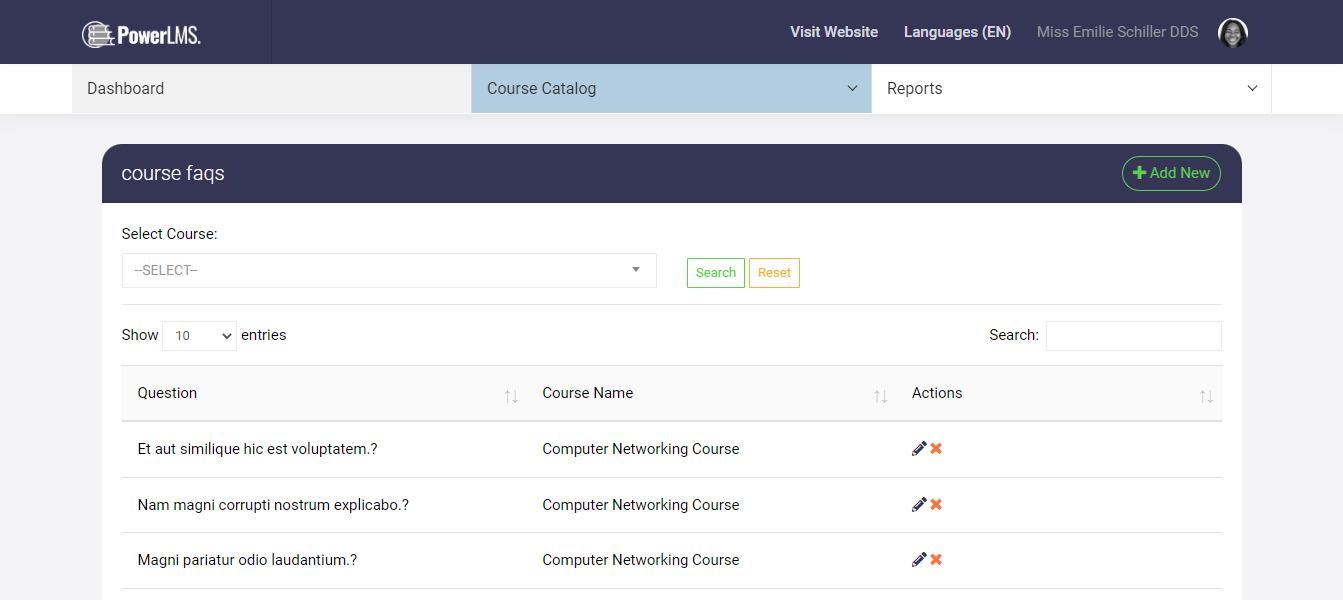
5. FAQs
You will have the access to create, update, and delete the Faqs. The basic requirement to create a faq is the course name, questions, and answers.
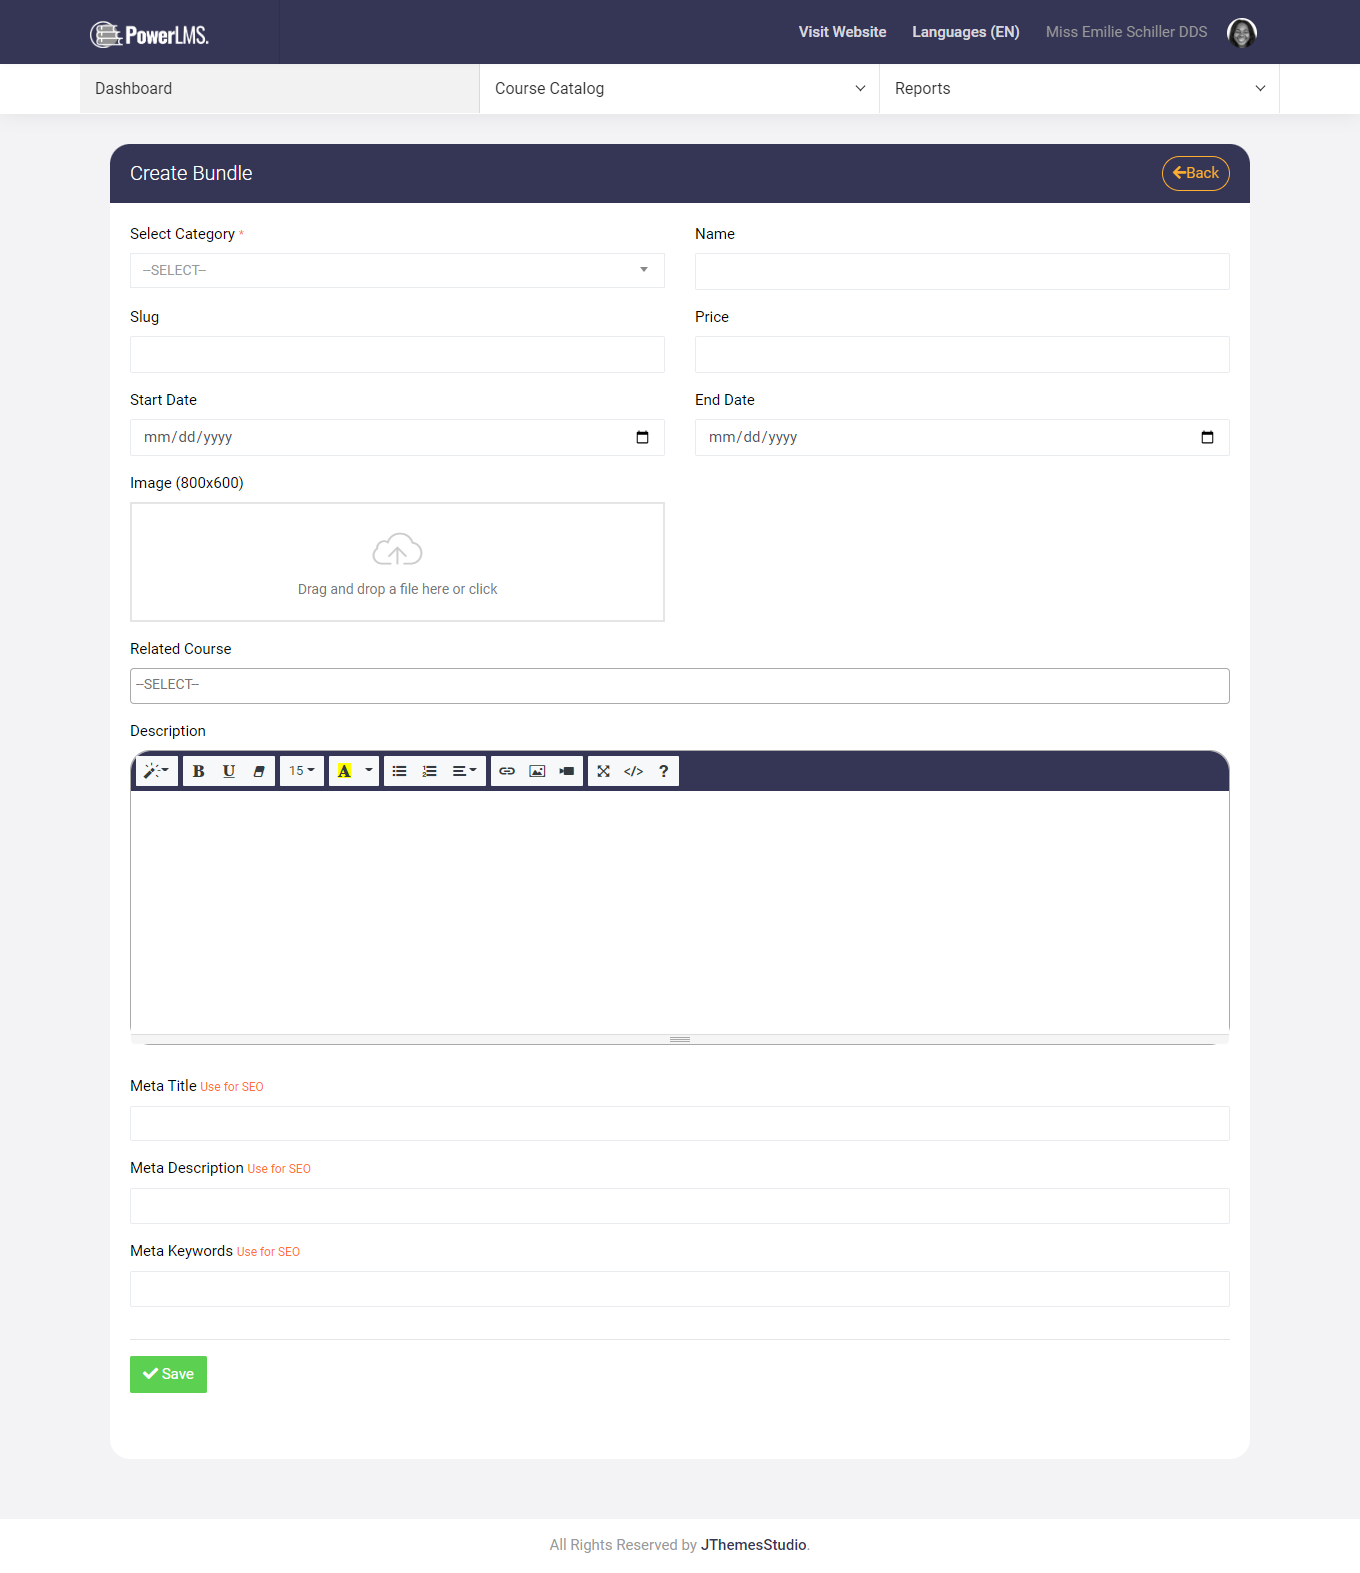
6. Bundles
This functionality will be used to create and manage bundles of the courses. Suppose you want to provide a combo of a particular category or subject-based courses to users at a discounted price, then this is the best choice for you.
It looks similar to Course creating and you can add multiple courses in bundles, you can also set a custom price for the course, set the featured image, and also add a description about the bundle.
Once you publish the bundle, the user will be able to purchase the courses available in the bundle.
The Free Bundle feature is also available.
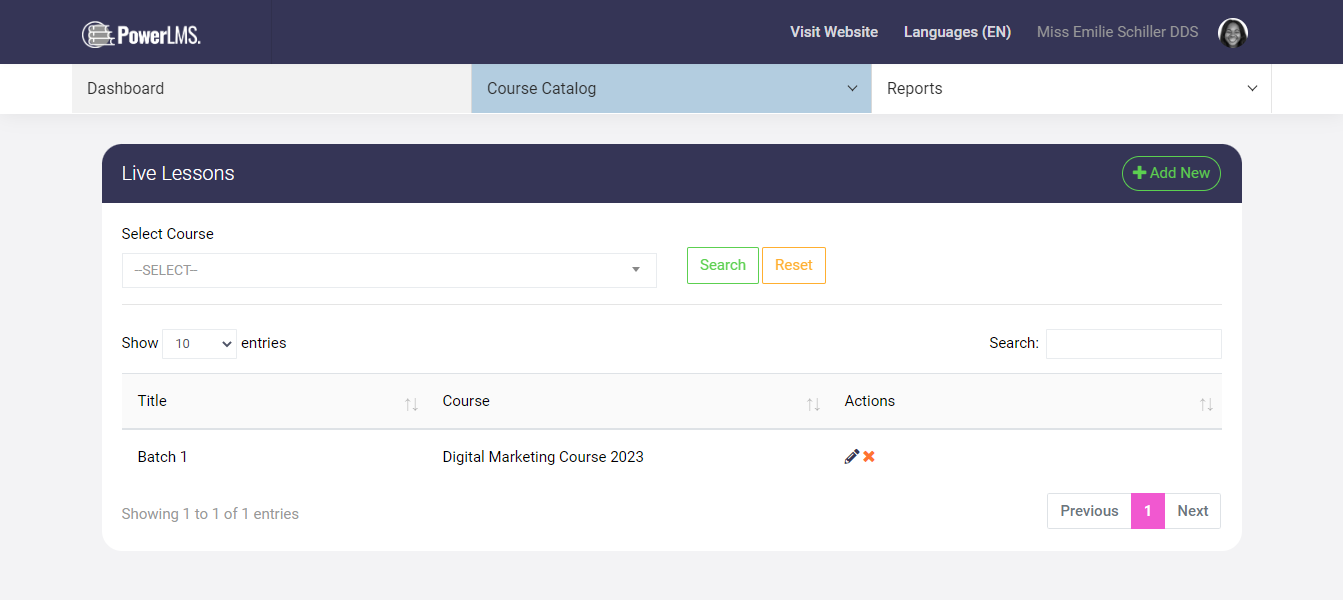
7. Live Lessons
You can add course with live lessons for user
8. Live Lesson Slots
you can add every live lesson with multiple slots.

Reports
There are three reports available.
- Sales Report
- Payout Report
- Course Report
1. Sales Report
You can see the user names, course names, price of the course, instructor revenue, payment date, and payment method.
2. Payout Report
Where you can find a list of Payout amounts and the request status.
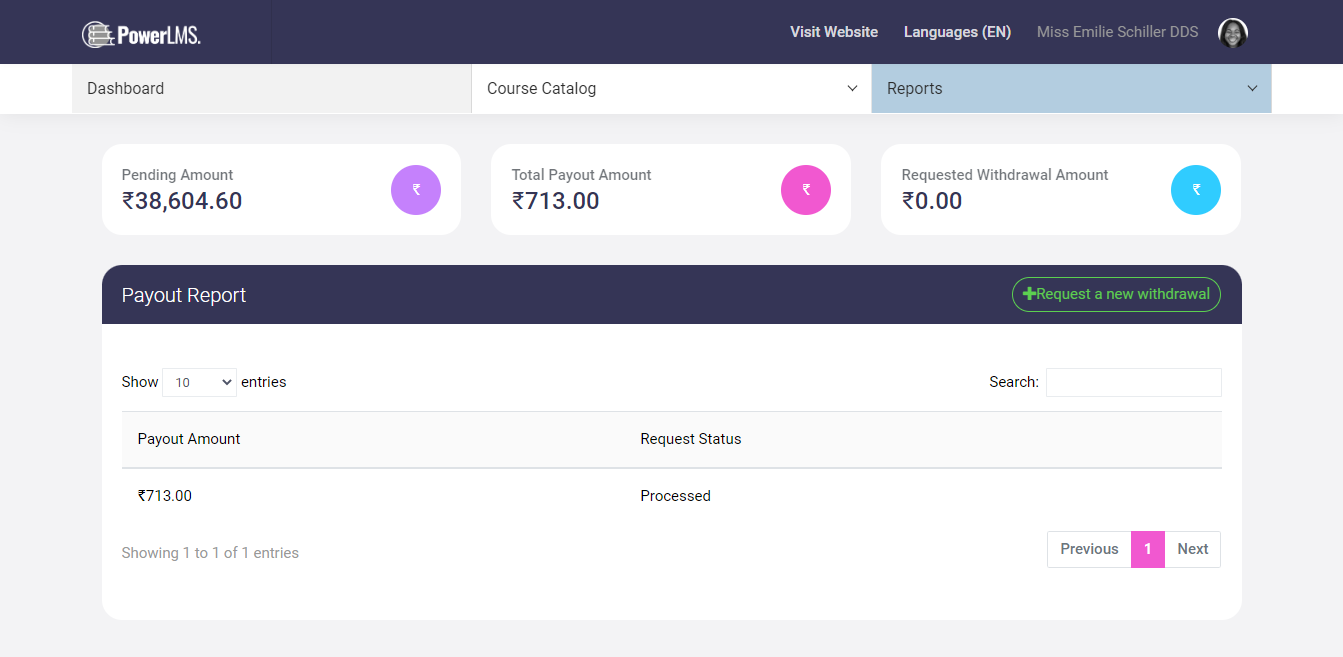
By clicking on the Request a new withdrawal you can request the withdrawal amount from the admin.
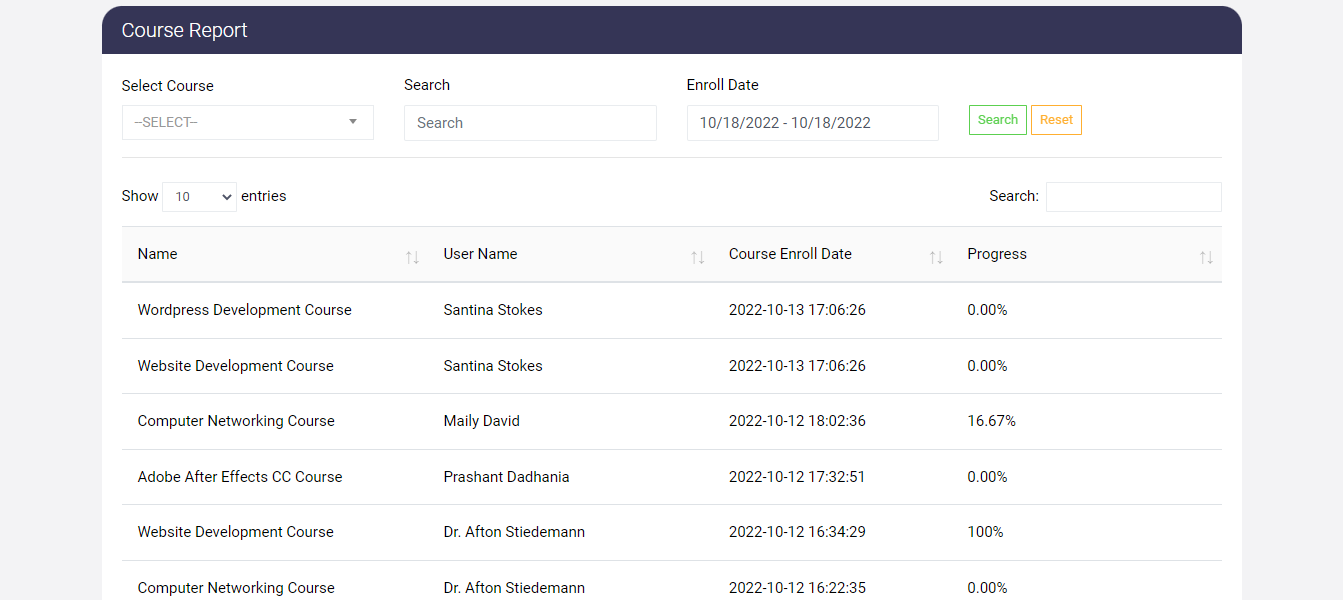
3. Course Report
You can see the course name, the name of enrolled users, the date the course was enrolled, and the percentage of the course progress.
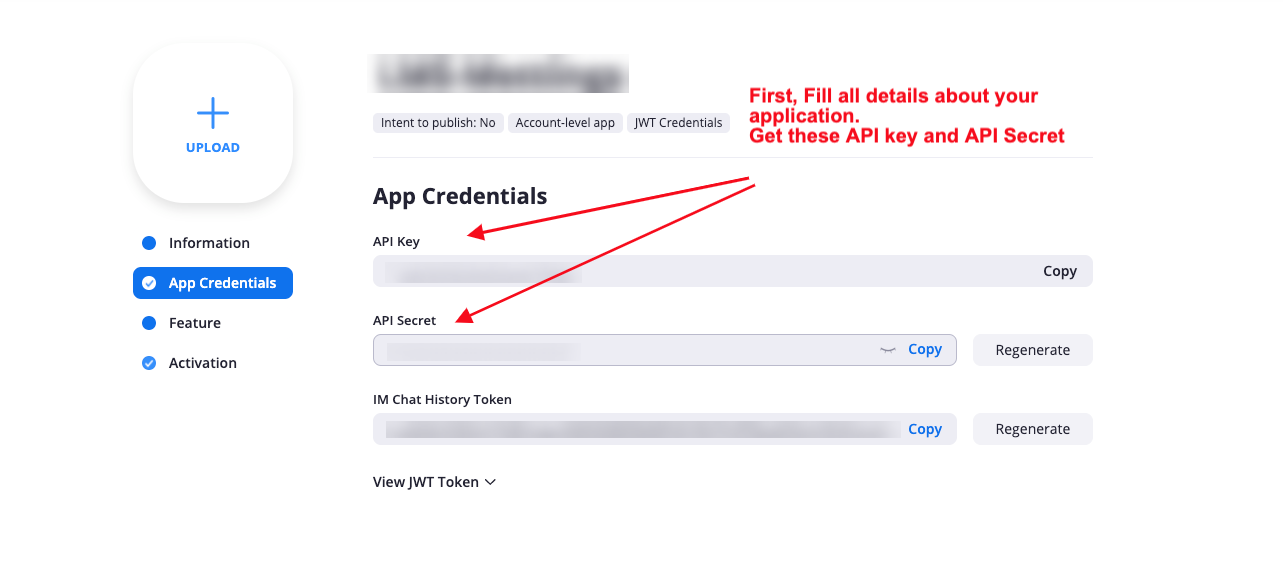
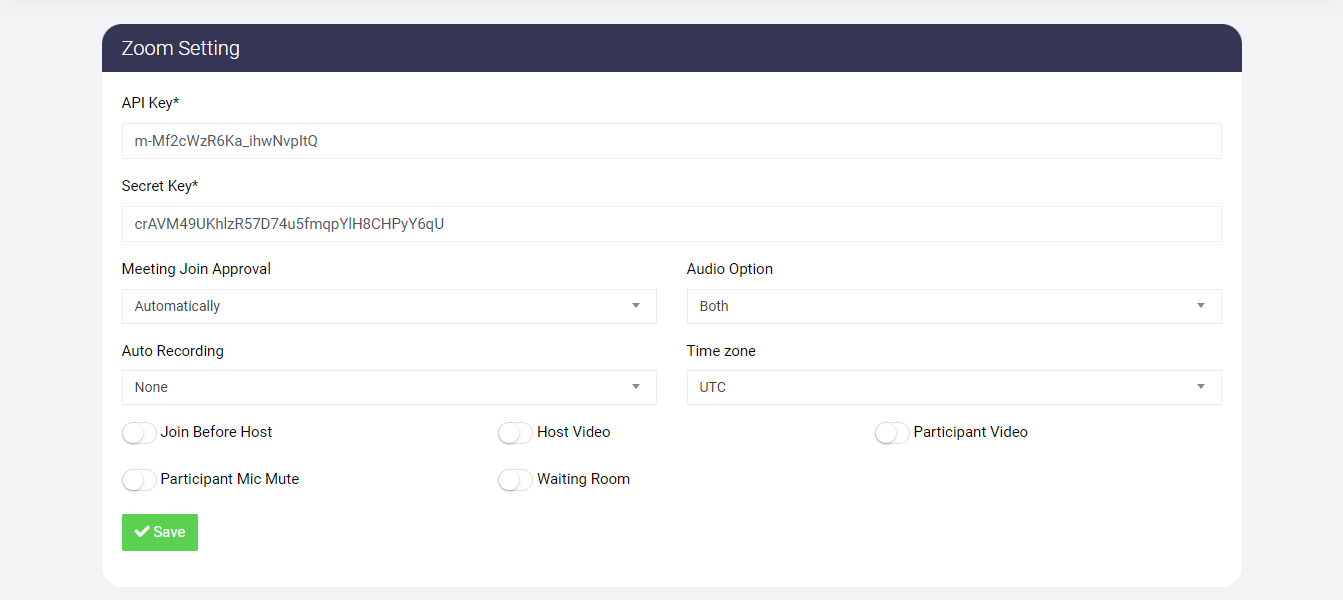
Zoom settings
You will find this under the profile icon. This is compulsory to setup for zoom meeting functionality. Otherwise, the user will not be able to attend live lesson to your products. On the header, click on the profile icon and select Zoom Setting. It will look like this:
How to Get Zoom Credentials?
1. Go to Zoom Market Place. If you have not zoom account than create new one.
2. Click on Build App.
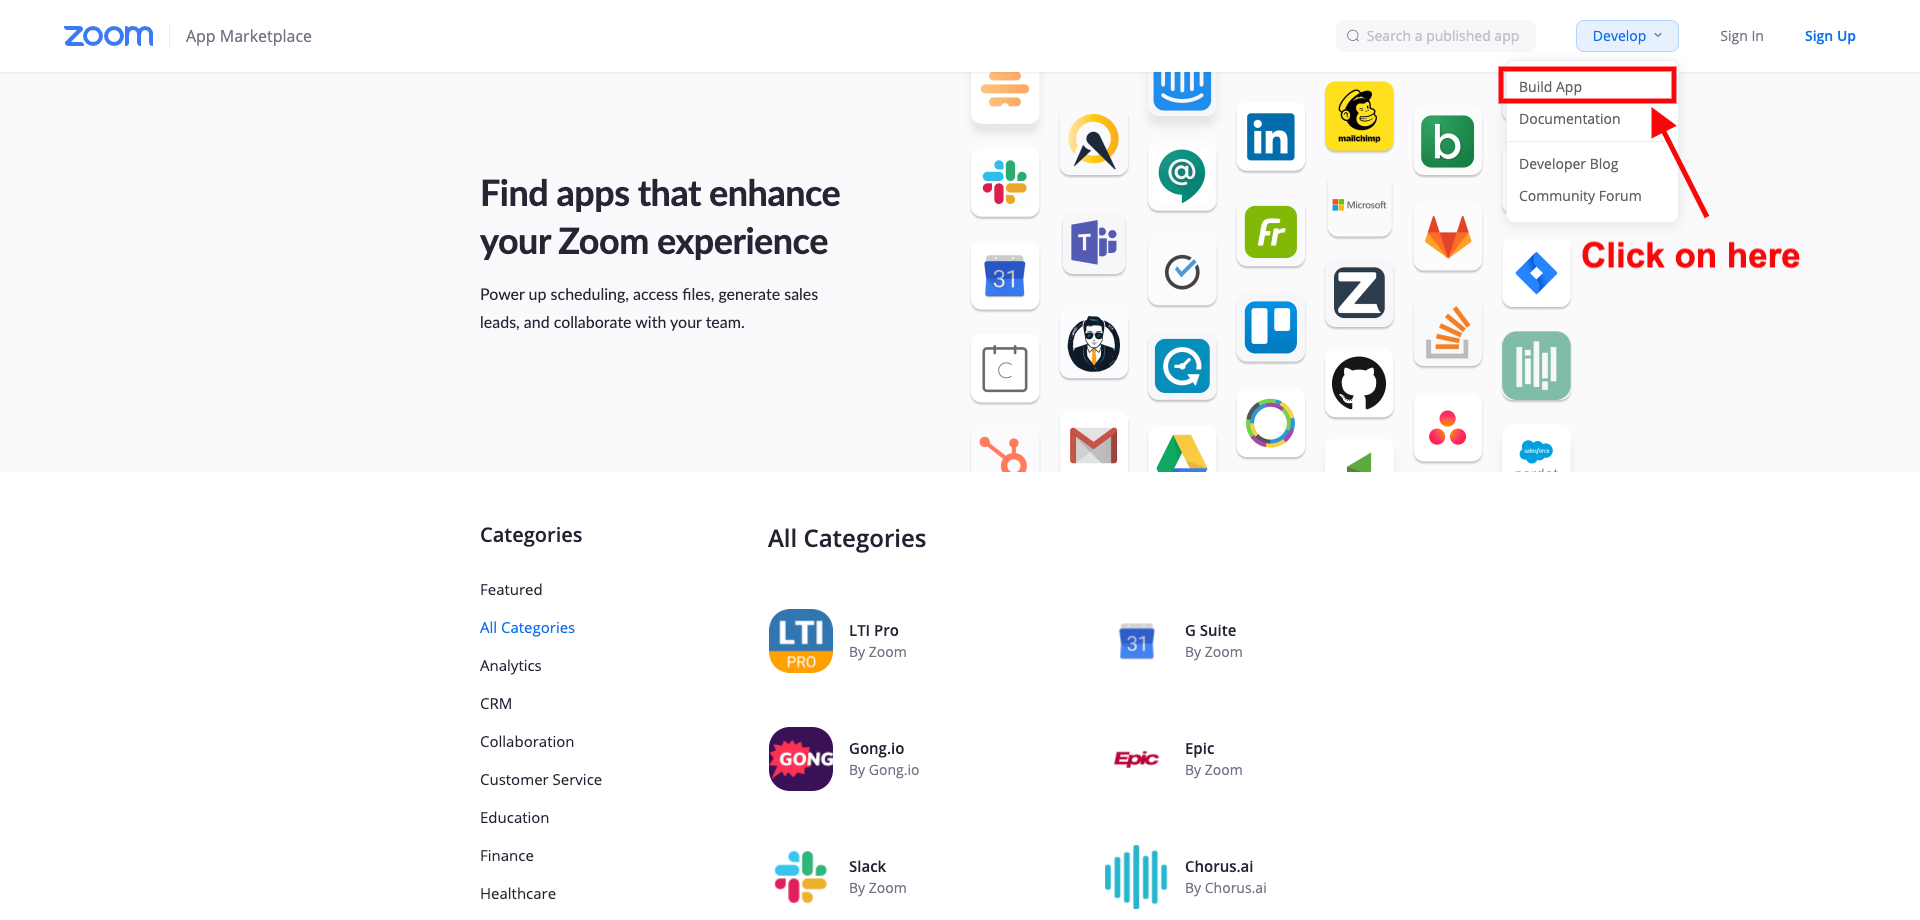
3. Create JWT app type.
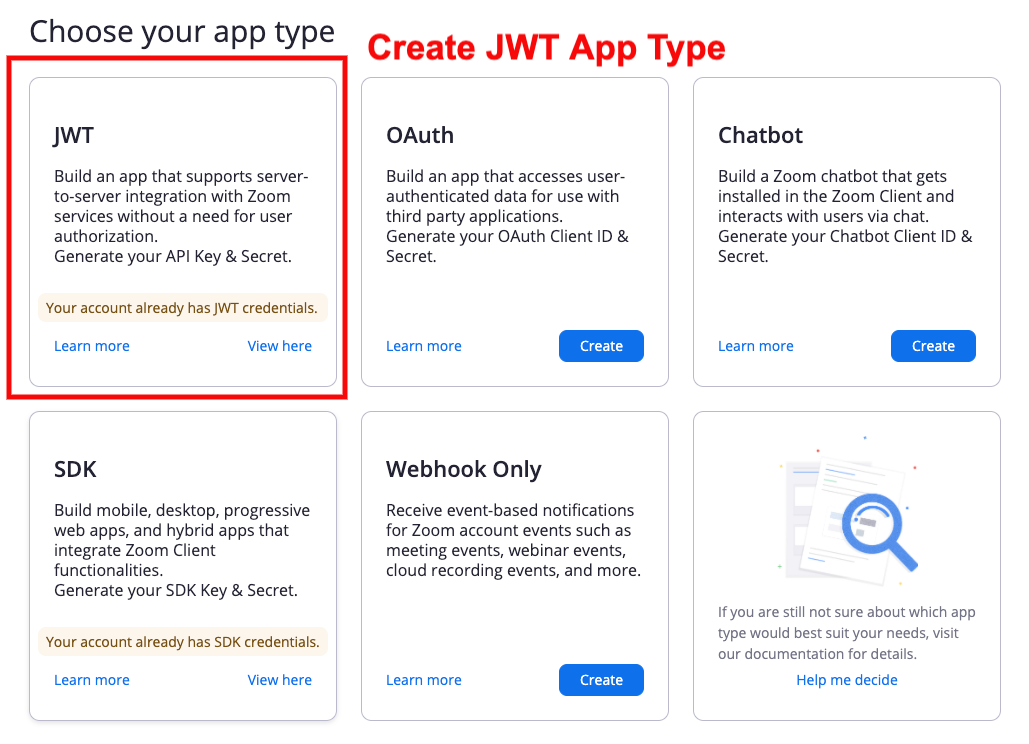
4. Get API key and API secret.